By John Fisher
As of this writing I have not made very many guitar pickups so this adventure of mine was a real learning experience for me. As usual I had to bug everybody in the world with my questions.
The goal was to make a set of humbucking pickups for an es175 jazz electric style guitar that I have just about finished. Since it isn’t a heavy metal guitar that I was shooting for I wanted some pickups that were a bit milder and cleaner then the Super Distortion Pickups. I remember several years ago that I owned an old es175 with original PAF Humbucking Pickups. It had a very pleasant sound that I remember to this day. My hope was that I can a least capture a bit of that sound with this guitar that I am working on. By the way, PAF is a well known term meaning “Patent Applied For”.That was put on some of the first Gibson humbucking pickups before the 60′s meaning that the Gibson company applied for the patent but have not actually received it yet. These pickups are some of the rarest and most expensive pickups on the market today. Can pickups like that still be made today? I would think so!
All that to say I hoped to get close to that sound or at least a good sound. This pickup is different then the other pickup that I made in my article ” My First Pickup“. The magnets are different and the coils shape is slightly different as well as the wire thickness and amount of turns. I will explain more in detail those differences and why throughout this article.
So the goal is to make pickups that will have a fairly clean and warm sound that is also “humbucking” to minimize unwanted noise. I had to make 2 of them or a set, one for the bridge position and one for the neck position. The neck pickup is made a bit different as the area near the neck has a lot more volume from the strings and it also has a lot more bass then the bridge area. To compensate the neck pickup was made to be a little thinner sounding. They say you should make the neck pickup with about 15 to 20 % less windings then the bridge pickup.
Some Basic design Factors
First of, all I am not an experienced expert on pickups. I do receive lot’s of e-mail’s from people with questions. Some questions I can answer and other questions I can’t answer. Here are a few basic fundamental factors that effect the design of a pickup.
-Every pickup has a peak frequency or a certain frequency that is predominant. This is one factor in giving the pickup it’s own sound.
-The more windings you have in the pickup the stronger the output of the pickup to an extent.
- Although more windings will produce higher output, high frequencies begin to suffer
- Thinner wire also has a larger loss of high frequencies then thicker wire.
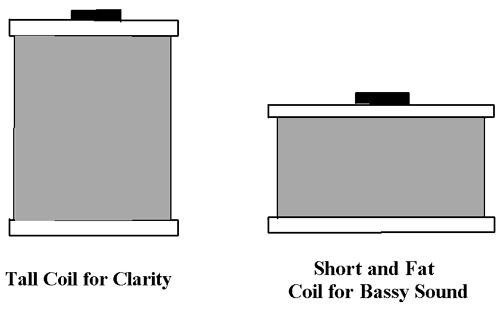
- Skinny and tall coils will produce a clearer sound then short and wide coils.
-Ceramic magnets are stronger then Alnico magnets producing higher output and a boost in the high frequencies but in some cases have a harsher sound.
Some Guidelines in deciding what Humbucking Pickup is best for You
The more wire that is wound on the bobbin, the greater will be the DC resistance when measured. Below is an idea of it’s effect using #42 wire. You will also notice that the more windings there are the greater the power of the pickup to a certain extent.
-To produce a clear tone: 3 to 6K ohms DC resistance on both coils together
-To produce a medium tone: 6 to 9K ohms DC resistance on both coils together
-To produce a loud and heavy tone for high output : 9 to 14K DC resistance on both coils together
Some specifics on my Homemade Pickup
Windings per coil – 5000 for the bridge pickup and 4500 for the neck pickup
Wire thickness for the coils: #42
Magnet type: Bar Magnet, Alnico #5
Coils saturated in wax
My Simple Humble Winder
I used much of the same approach in making these pickups as I did with my “First Homemade Pickup”. I haven’t been making a lot of pickups so if I am going to make 1 or 2 a year, it’s practical for me to do without investing in a lot of fancy machinery and supplies. Maybe some day I will upgrade my methods but for now I made these pickups with very crude methods using no real special tools. I hand wound the coils with a simple manual hand drill hooked up to a homemade counter as with my first pickup.
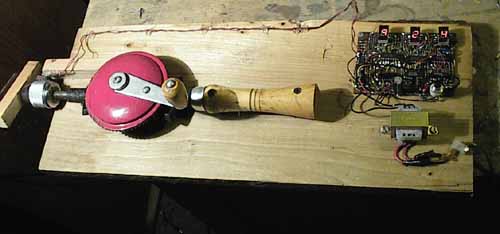
Here as you have seen in other articles is my winder which consists of a mandrill and homemade digital counter. (See my article on how to use a calculator as a counter.) You can’t get too much more basic then this but it worked. I bought the mandrill for $10 and have used it not only for winding pickups but also for winding transformers. When getting a hand drill for this, it is important that the shaft and chuck are not wobbly and that there is no play in it.
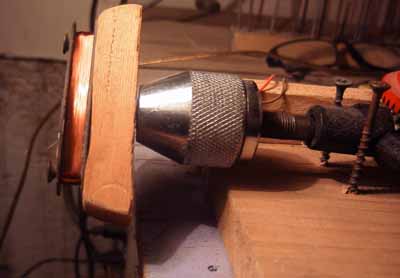
Here I simply got a piece of wood with a thick nail in the center to enter into the chuck and screwed the bobbin to be wound to it. The trick is to make sure everything is well centered when it turns and that it is real straight without wobbling. As you can see I simply put screws in a board to hold the drill to it. Quick and simple without having to build anything. The spool of wire is on the floor siting on end directly under the bobbin to be wound. The spool of wire on the floor does not need to move but the wire just unravels as the pickup is wound. It is important that the spool edges are smooth and free from any burs or rough spots that would snag the very thin wire. Please note that most pickups from Fender and Gibson are wound with #42 wire. There are exceptions of coarse. If you use wire that is even 1 or 2 numbers thicker or thinner it will greatly change the sound of the pickup and the desired number of turns on the bobbin may or may not fit.
Making the Bobbins
First of all it is practical to just buy the bobbins for making a pickup but if you can’t find them easily and you want a learning experience, it is possible to make them. One other advantage to making them is that you can make them a custom shape and height if desired.
I made mine from the plastic from an old CD case and some maple hard wood for the core. When first doing this I would cut out the shape of the bobbin out of plastic and then drill the holes for the pole pieces but I found it is much better to prevent splitting the plastic by drilling the holes first and then cutting out the shape afterwards. The same idea goes for the wooden core too.
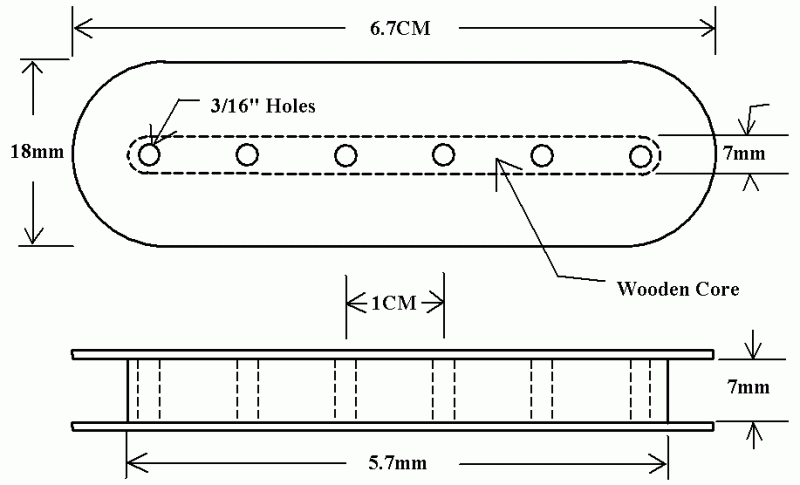
Here is a detailed diagram of one of the bobbins that I made for the bridge pickup. It is made from the plastic of an old CD case and the core is made of maple wood. I glued the plastic top and bottom to the wooden core with super glue. I originally used household glue but I found that the super glue worked better and would dry faster. Important: Please note that the pickup bobbins for the neck pickup are almost the same as the bridge pickup bobbins but the pole pieces are slightly closer together compared to the bridge pickup. This is because as the strings approach the neck they become closer together as opposed to the spacing of the strings at the bridge. Therefore the poles pieces for the bridge pickup are spaced 1 cm apart whereas the pole pieces for the neck pickup are spaced 9.5 mm apart. That is the only real difference in the physical shape of the bobbins. I also wound a little less windings on the neck pickup to give it a comparatively weaker and thinner sound then the bridge pickup.
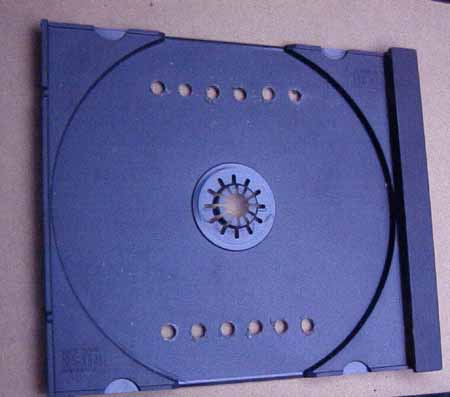
Here is a CD case that I used to make the tops of the bobbins. I first drilled the pole piece holes (3/16″) then later cut out the shape of the bobbin. This worked good as it was easier not to split the cheap plastic while drilling. I also used some of the clear plastic from the case for the bobbins. In this particular case I didn’t care so much what it looked like as it would be covered later with the pickup covers.
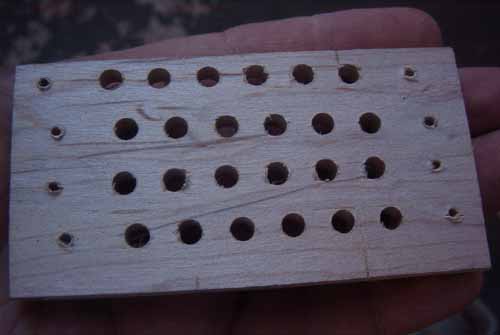
I got a piece of maple to make the cores of the pickup. I shaved it down to 7mm thick and then drilled the holes for several pickups on it and then later cut them out with a fine hacksaw.
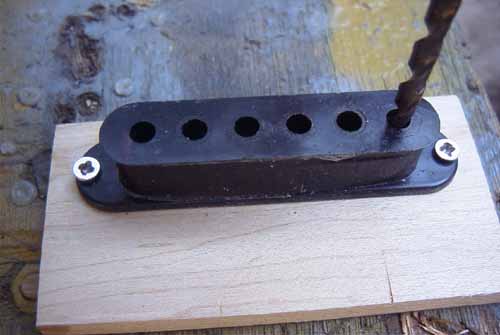
One of the biggest problems in making the bobbins is accurately drilling the holes which although may seem simple can be difficult to get in perfect. A very good idea is to get a metal guide made at a machine shop that has a drill press. One thing I tried as you can see here is I got an old cheap single coil pickup that I didn’t care about and used it as a guide to drill the holes for the bobbin cores. I conveniently screwed it to the wood for steady drilling. I also used this idea to accurately drill the holes in the plastic CD case too. Ultimately a metal guide would be better.
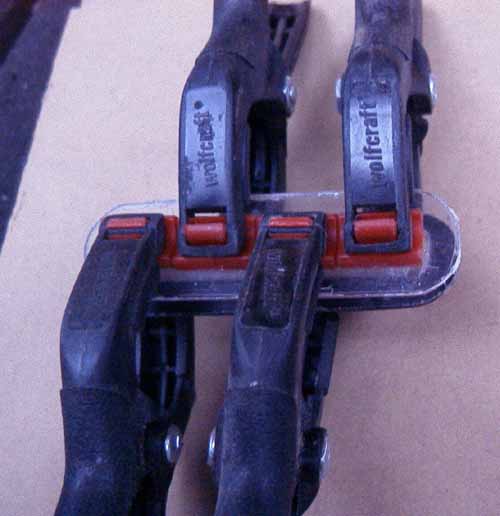
I put a generous amount of super glue on the wood core surfaces and then placed the plastic sides in position. I used small spring clamps the hold it together while the glue dried. I left it to dry for about an hour. After it was dry I sanded the edges of the plastic nice and smooth. This is important as if there are any rough edges on the plastic then the very fine wire can catch in the bobbin while winding. I wound 5000 turns on each bobbin for the bridge pickup and 4500 turns on each bobbin for the neck pickup.
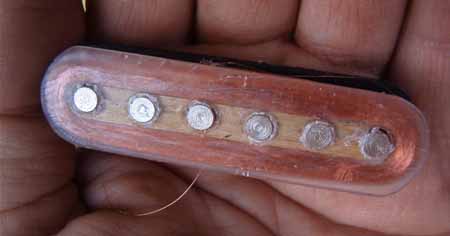
Here is on of the bobbins that I finished. It looks a little waxy because I soaked it in hot wax to saturate it. I will explain more about that later. I also inserted the steel pole pieces. They are 3/16″ thick and can be any steel rods or even screws. I got these out of an old cheap pickup but there is nothing special about them.
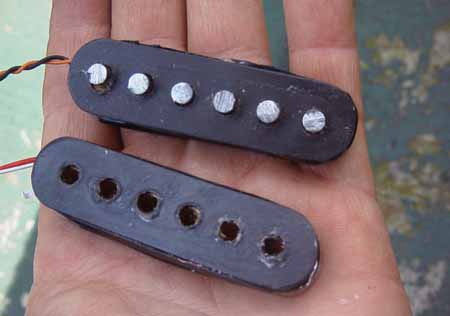
Here is the other side of the bobbin ( also a little waxy) I used some with clear plastic and others with the black plastic. Like I said, it didn’t really matter what they looked like as they will be hidden with the pickup covers. After the bobbin was wound, I soldered some lead out wire as leads to the very fine wire of the coil. I then wrapped some Teflon tape around the coil as it is non sticky. I then wrapped some electrical tape around it. The Teflon tape is to protect the coil from the sticky electrical tape. That way the coil can be opened up some day if necessary without ripping the fine wires with the sticky tape.
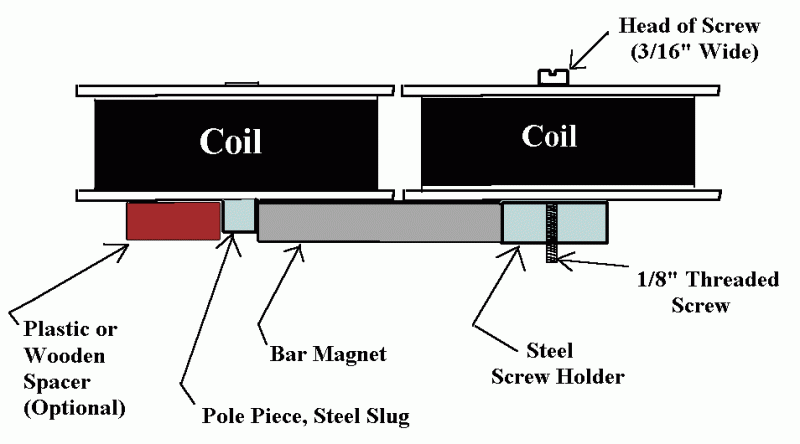
Here is the end view of the pickup without the base plate and the cover. The wooden or plastic spacer is optional. I didn’t use a spacer because I just potted everything with wax anyway.
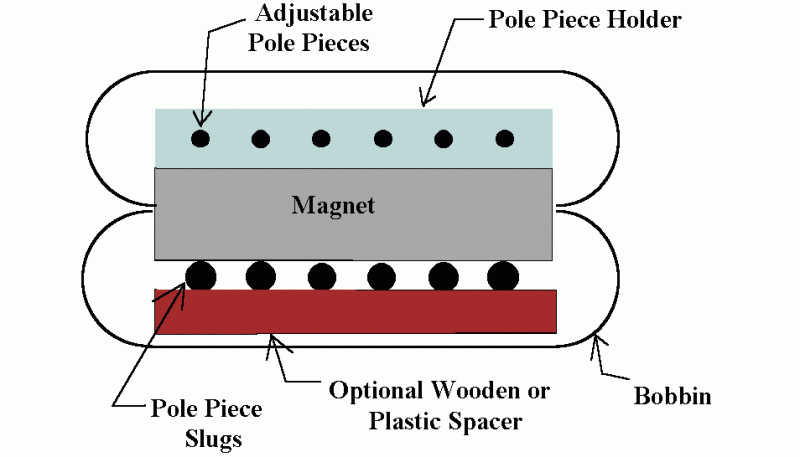
Here is a rough drawing of the back view of the pickup. The drawing may not be proportioned perfectly. The main issue is to try to get the magnet to butt against the pole piece slugs and the pole piece holder. I had to shape the width of the pole piece holder a bit for it to touch as well as possible to the magnet which will also hold the 2 bobbins close to each other.
The Pole Piece Holder
The pole piece holder is a metal bar about the same thickness as the magnet that has holes in it where the adjustable threaded pole pieces go into. Normally they are threaded holes so that the pole pieces can be adjusted. I didn’t have the 4 dollars in my pocket when I was down town to get the pole piece screws to buy a tap to thread the holes so I just made it so that the screws fits snugly into the non threaded holes. This still works, and for the pole pieces to not fall out of the pickup and to also still make it somewhat adjustable I just put a bit of glue from a glue gun in the hole of the bobbin to hold the pole piece in. This is not the best but it still works fine.
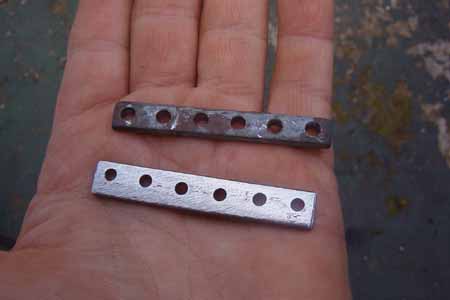
The pole piece holder on the top is one that I got out of an old pickup. I used it as a guide to drill the holes in the homemade one below it. Just like drilling the holes for the bobbins it is real helpful to have a guide for drilling the holes. I later made the width to fit nicely against the magnet when the pickup is put together.
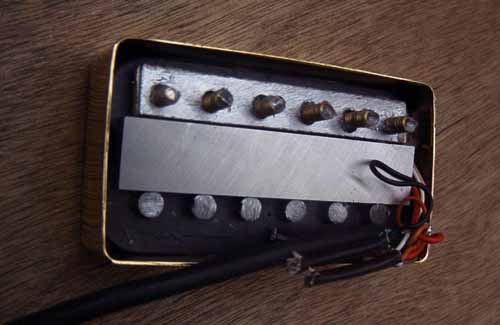
Here is the back of the pickup showing how it is put together. The magnet touches the pole piece slugs on one side and the pole piece holder on the other side. You will notice that I have several wires coming out of the pickup. I have 5 wires all together: 2 for each coil and 1 that is soldered to the pickup cover for ground. I’ll talk more about pickup wiring later.
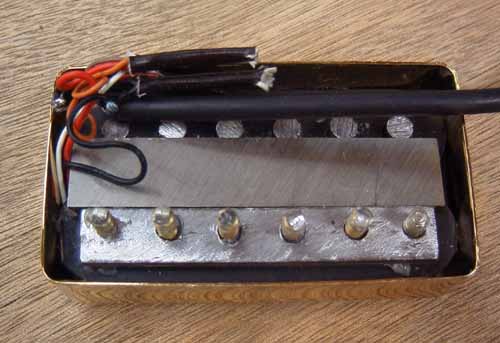
Please note that I didn’t include a wooden spacer on the opposite side of the pole piece holder where the other non threaded slugs are. I am going to just pot the whole pickup with wax inside the pickup cover anyway and the extra space is nice to have for the lead out wire to fit in. Normally I would use thinner wire to have coming out of the pickup but I didn’t have any at the moment so I used this wire which is kind of thick.
Saturating the coils
Before I get any further on this I would like to mention that I saturated the bobbins right after they were wound. This is to help insure that the pickup will not be microphonic. A microphonic pickup in most cases is where some of the windings are loose and they vibrate or move when using the guitar. This makes the pickup act like a microphone to where vibrations are acoustically picked up causing the pickup to squeal when the amp is turned up loud. It can be so bad that you can talk in the pickup and hear your voice come out of the amp. This effect is undesirable and can in most cases be cured by saturating the coils with wax. Homemade pickups that are wound in a crude manner like the ones I made benefit greatly from saturating them in wax as they are less then perfect when hand wound. I just used normal candle wax. Some people mix in a bit of bees wax as it is less brittle then candle wax but you can only put in a small percentage. (About 20 %) as it takes a higher temperature the melt it. I just used candle wax alone.
Because the bobbins are made of cheap plastic you cannot heat the wax more then 70 degrees centigrade or the bobbins will begin to warp and melt. The most practical way to do the saturation is to put some candle wax in a can or small pot and float it in water that is in a bigger pot and heat it on the stove. Monitor the temperature with a thermometer to make sure that it doesn’t go over 70 degrees centigrade. The fact that the can is floating in a water bath helps to keep the temperature more at a moderate level because at one point you can turn off the heat and it will remain the same temperature for some time. The wound bobbins are submerged in the wax for about 20 minutes or so. I hang them inside the wax with some stiff wire so that they don’t touch the side of the can. You will see bubbles come to the surface as the coils are being saturated. When done, take them out and wipe off the excess wax with a paper towel and let them cool. There are other sophisticated methods to do this but even this simple method will help greatly. After I put the pickups in my guitar I turned up the amp full and had no microphonics from the pickups whatsoever.
Potting the Pickups
After the pickup was assembled in the pickup cover, I then potted it by filling the pickup with hot wax. Some people use epoxy resin for this but using wax will enable you to take the pickup apart if ever the need arises.
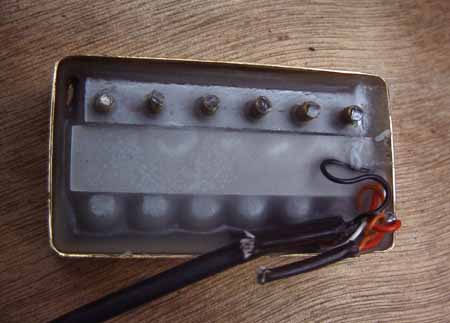
Here is the pickup full of hot wax. It is important when doing this to cover the pole piece holes on the front of the pickup cover with masking tape so that the hot wax won’t just run out the holes when the pickup is filled. It is also important to remember not to heat the wax hotter then 70 degrees centigrade. Some important reasons for doing this are: the pickups will be more protected, it will further reduce the chances of any microphonics because it will prevent the pickup cover itself from being microphonic. It also holds everything together without the need of any screws or spacers.
The Base Plate
The back plate is used to support the pickup and mount it to the plastic ring which also has the adjusting screws and springs that are used to adjust the height of the pickup. It is also used to shield the inside of the pickups from noise.
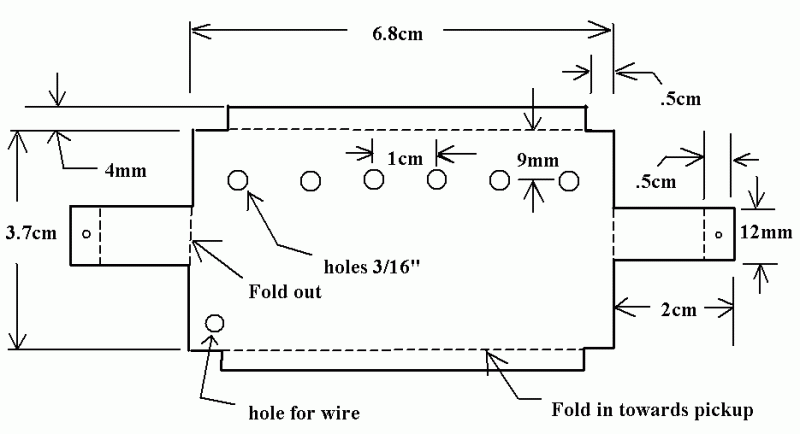
Here is a diagram with some detailed dimensions of the base plate The base plate needs to be made from some metal that is not sensitive to magnets like brass. I got some stuff downtown that was part brass and part tin (I think) that was really cheap. You can use aluminum but then you won’t be able to solder to it. It is normal to have 4 small screw holes in the base plate for small screws that will screw into the bobbin. I didn’t do that because I just held everything together with the wax. If you were to make a pickup not using a metal cover on the front then the screws would be necessary.
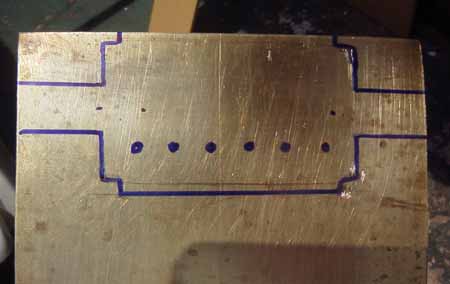
Here you can see that I drew out the pattern on the brass plate. Normally it is best to use a finer pen or scribe the shape but I just wanted to be able to illustrate the idea better.
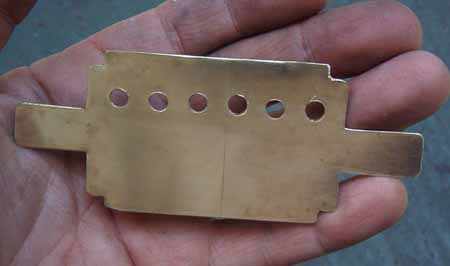
Here it is cut out. I was able to use just ordinary tin snips for the job then I filed the edges.
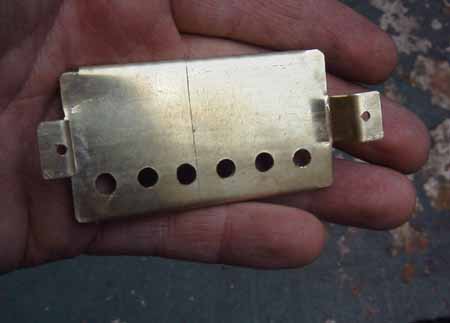
Here it is bent to shape. I just used a pair of pliers to do this. You will notice that I made some small holes for where the pickup adjusting screws will go. The ideal is to tap the hole with the correct thread but I just made it so that the screw fits tight in the hole. Another option is to solder a nut to the plate.
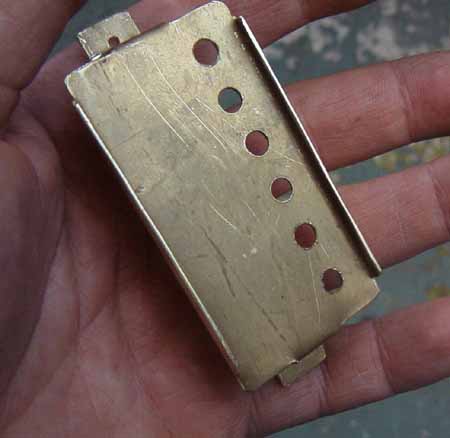
This is the side of the plate that will go into the pickup.
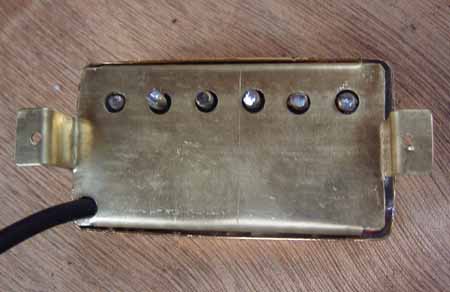
Here is the base plate inserted into the pickup. It is not shown but the plate is then soldered at several points to the pickup cover. This needs to be done with a fairly strong soldering iron. (At least 60 watts).
Magnet Orientation
The question will arise: ” which way does the magnet go?”. After asking many of these questions myself, Jeff and others over at Ampage, helped me a lot with these questions. Generally speaking the south pole of the Magnet should face the adjustable poles.
I got lots of anwers to my questions over at Ampage. Got to firebottle .com and then to Ampage and there will be a form on making pickups. They also have some hard to find materials that they offer for sale for making pickups
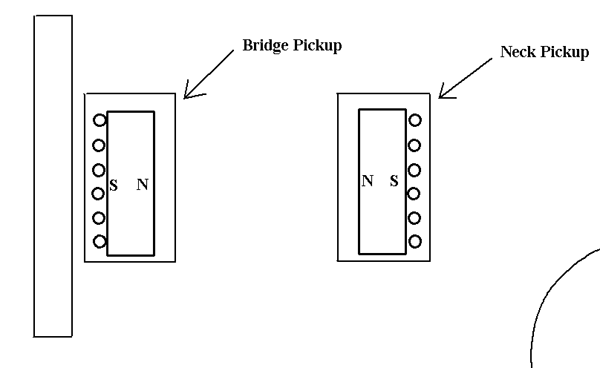
Here is how the magnets are oriented on the guitar. If you were to get 2 identical pickups for a guitar you simply turn one around in relation to each other. The only real difference in the neck pickup and the bridge pickups is that the bridge pickup ( in this case) has 5000 turns per coil and the neck pickup has 4500 per coil and the pole pieces are slightly closer together on the neck pickup.
How to tell which is the North Pole and which is the South Pole of a Magnet
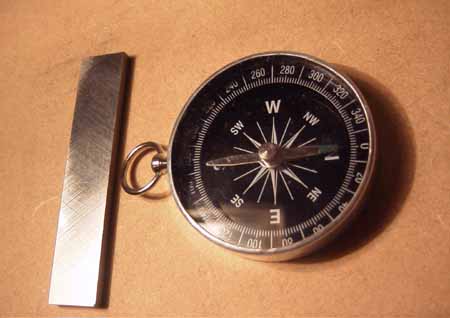
Jeff told me that you can know which is the north pole and which is the south pole of a magnet by simply getting a compass at Wall Mart for about 4 dollars. Well mine cost me about $1.80. You will notice that the north and south poles of a bar magnet for a pickup don’t go from end to end but from side to side.
Wiring the Pickup
There are many ways to wire up pickups which will create a wide variety of results. This is a subject all in itself but for the pickups I made here I wired them in the most common manner which is the 2 coils of each pickup in series. I will save all the hot rod wiring for my next guitar which will be a solid body rock and roll guitar.( I think)
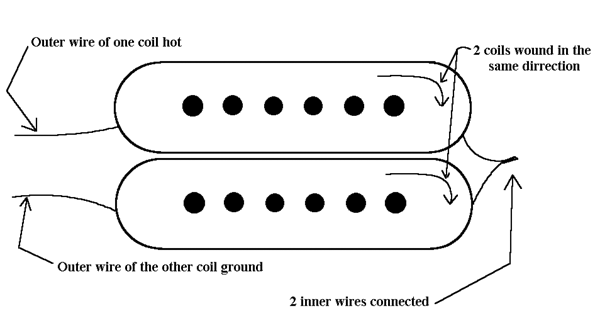
Here is the most common wiring for a humbucking pickup. The series wiring makes the pickup powerful. The wire that is ground will also be connected to the case or pickup cover which is shielded. Note that you can use either of the 2 outer wires as either hot or ground. The only difference is that it will change the phase of the pickup depending on what wire is used for ground or hot. If you are using 2 pickups on a guitar you usually want them both to be in phase with each other. If they are not in phase with each other, you will get an unusually thin snarling sound without much bass when the 2 pickups are on together. If this happens the 2 pickups are out of phase and you need to simply reverse the 2 outer wires of one of the pickups to correct the problem. Some people will even install a switch to have this option of out of phase pickups as an effect.
Some Different Pickup Wiring Configurations
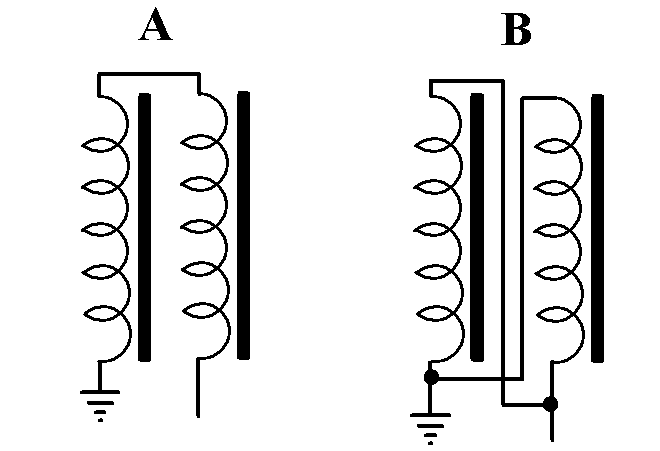
Example “A” is probably the most common way to wire up a humbucking pickup. It’s wired in series so that the 2 coils with 5000 turns each (in my case) add up to 10,000 turns each which I got a DC resistance of about 8K. This gives a fairly powerful pickup.
Example “B” is wired in parallel which gives a clearer tone and is a little brighter but with a weaker signal. (Not as good for rock and roll). Please note that if the 2 coils are in parallel and each coil has a DC resistance of 4 K then the DC resistance of the pickup in series will be only 2K. This is why the signal will be weaker and the weaker signal is the trade off of having a clearer tone.
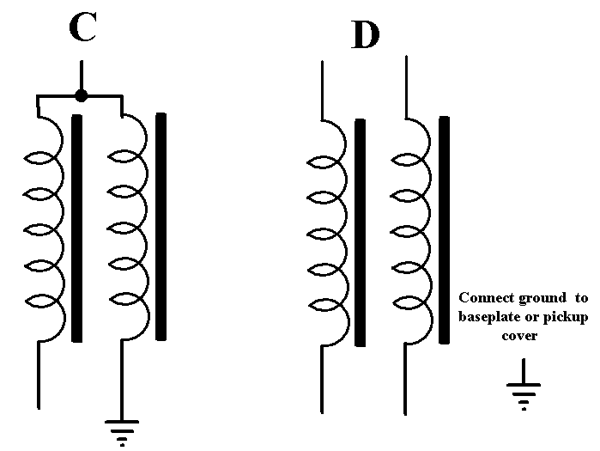
Example “C” is where you make a tap between the 2 coils and when connected like that you have a single coil pickup. Not a totally authentic strat sound but it gets a lot closer to it. It is no longer humbucking.
Example “D” has 5 wires that come out of the pickup.(4 connections for the 2 coils and a 5th one which is connected to the base plate or pickup cover as ground. Having the 5 wires coming out of the pickup gives you the option of any configuration desired. In any of these examples illustrated you may want to have switches to change the different configurations to give a large variety of sounds. It is even possible to have a multi switch setup on each pickup giving you even more sounds using the 2 pickups. You can even have a switch to make the 2 pickups in series with each other and so forth, so there is lots that you can do. Instead of drilling a bunch of holes in your guitar there are pull out switches available that mount where the normal knobs of the guitar go only that the knobs can be pulled in and out for different switch settings. It all depends on what you want out of your guitar and what your preferences are. I once had my guitar wired like this with dozens of options but after using my guitar for a couple of years there was only a few settings that I ever really used and many that I never used but the extra options were still nice to have for that one song that needed it.
The Finished Result
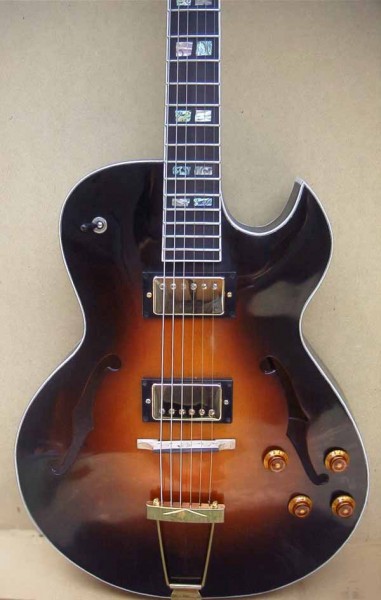
I was very pleased with the sound of these pickups. The balance between the neck and bridge pickup was just about right. Of coarse these pickups will sound a little different in a solid body guitar as this electric arch top that I built has a sound of it’s own and the body really plays a big part in the sound.
http://galileo.spaceports.com/~fishbake/buck/humbuck.htm





Hello John………….This is the most complete explanation i have seen of how a pickup is designed.
However, no online forum i can find has yet been able to tell me a yes or no to:
Do the pole slugs in a humbucker touch the baseplate or not. I have tested continuity on a humbucker and found mere wax between poles and baseplate. In one row four poles were in electrical contact and two not….
just bloody random in this case….. But how is it supposed to be? Contact or gap?
I would be very grateful if you would be the one person to give me the answer to this, which to everyone else in the world seems a non-question.
It does not matter if they touch the base plate, the important part is that they touch the magnet so the slugs can pick up the vibrations from the strings. Whether or not the slugs and/or screws are grounded is kind of secondary.
Muito completo e útil artigo sobre auto construção de pickups,com todos os tópicos que importam nestes casos.
Muito obrigado e votos de muito sucesso em todas as vertentes musicais.
Até breve
Joaquim Queiros
Hi Sir! Thanks for this Complete, more Complex explanation on Pickup DIY Building, my Question is, : (a) How pickup coils work On each winding Directions,? Magnetic polarity on pickups Windings? (b) reversed type humbucker pickups, installed on signature ibanez guitar models..
Thank you in advance sir.!
Hi, thanks for this complete article, it´s been very helpful in clarifying some topics. If, by chance you can explain me the differencies between this and the johnny smith style, neck attached, I´ll be very grateful, though there isn´t much out there on the topic. Thanks again
Arent coils supposed to be wound in different directions? So one CW and the otherone CCW?