

by Neil Ostberg
-Liners Peones and Glue Blocks.
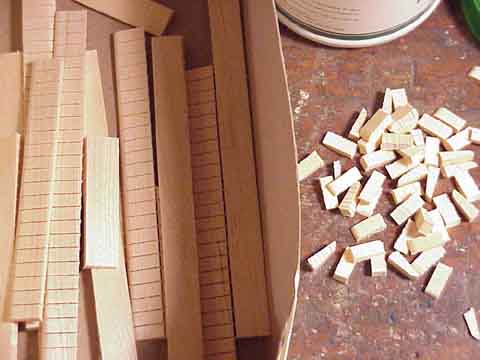
Liner blocks have various names, among them are,peones,contraaros,linings,glue blocks etc. Their purpose is to give added glueing surface to the sides.They must have enough surface to allow for the removal of wood for the banding and still support the top and back. Pine,spruce,mahogany etc. are used for liners.A light wood is prefered as heavy woods add excess weight to the guitar.
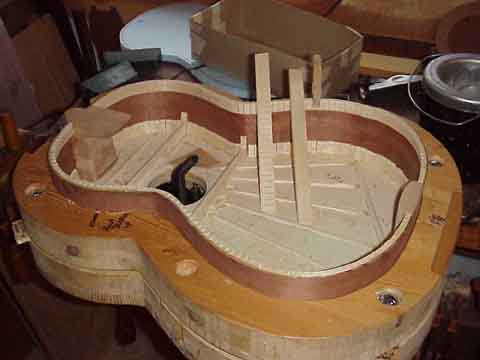
Image of linings completed. When glueing individual lining blocks to the face give them a heavy coat of glue and press them in. Individual blocks are my choice as the grains are mixed and give greater strength and follow irregular surfaces.When gluing back liners hold the top surface higher than the sides for ease of planeing when fitting the back.
-Body Assembly Install Neck, Top, Sides, Glue and End Blocks, Back Liner Back and Glue Back
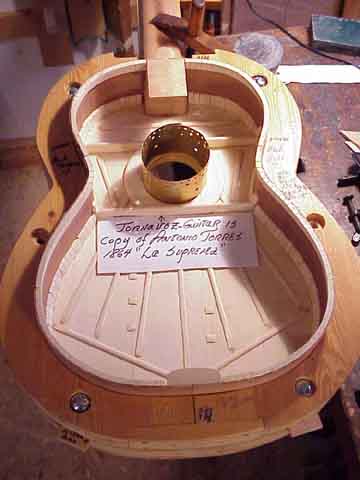
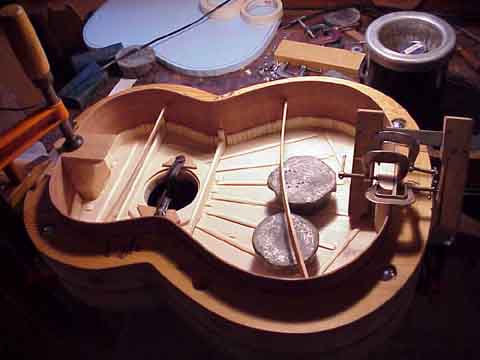
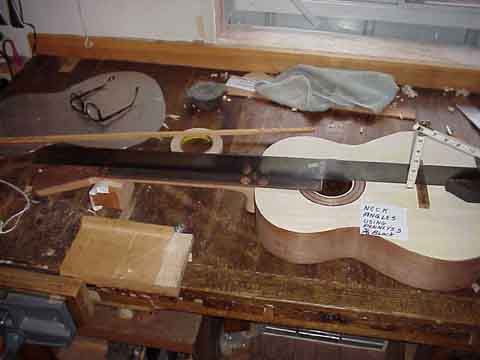
Exploded view of guitar body,the top is complete except for cutting the braces to allow the sides to rest on the inside of the guitar top,this will be done after the neck is glued to the top. In preperation for glueing the neck to the top a recess must be cut to allow the fingerboard side of the neck to be flush with the outside of the top this recess must fit perfectly to the interior of the top. Caution this is an angled cut as the neck is at an angle created by the solera to make correct action height. Also as the top is domed it will be slightly curved. Think before cutting the neck do not rush and when cutting allow extra wood for final fitting.

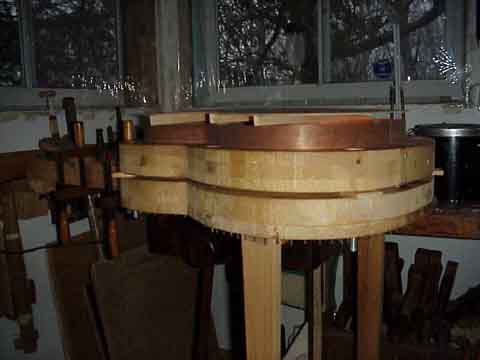
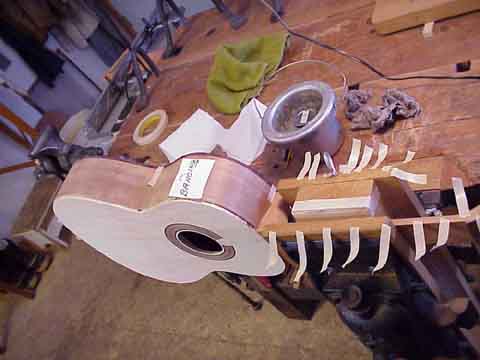
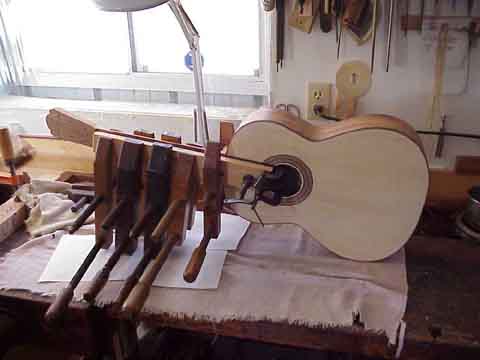
The neck is now glued to the top in the image. When gluing the neck make certian that the center line of the top and neck is aligned with the center line of the solera.Prior to glueing the neck to the top, tape a piece of waxed paper to prevent gluing the top/neck joint to the solera.In additon the solera should have a coat of shellac or french polish plus paste wax to protect and provide protection in case of error. After the neck is glued to the top, remove the top/neck assembly,place the side forms on the solera and bolt down. Place the bent sides into the solera with side forms attached,heat up the bending iron and give the sides a final bending ,fitting them as close as possible without forcing to the sides. They will overlap and must be cut at the centerline of the solera,then cut the sides at the neck joint cut them slightly shorter than necessary to achieve a slip fit. The sides of the guitar are not glued to the neck but have a spot of glue or a small wedge glued in the interior to stop buzzing. That it is not glued does not affect the life of the guitar, I have observed 150 year old guitars with this joint not glued and the guitar is in good condition. When sides are fit,remove side forms and remove side form filler block to allow the neck to pass through the side form. Then make three eights inch thick by two inch square shims with a hole in the center fitting loosely the side form bolts ,these blocks are placed between the solera and the side forms to give clearence for the top neck assembly. Now make certian to put waxed paper at the neck side joint and at the end block area,place the top,neck,side assembly on the solera,align all with the solera centerline and clamp in sound hole and weight the top as in images. Now place shims on solera and bolt side forms to the solera.DO NOT GLUE THE SIDES TO THE TOP OR TO THE NECK JOINT.
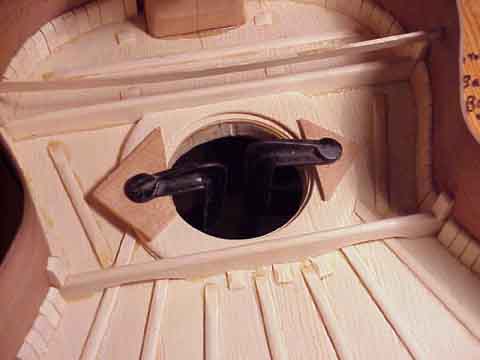
Note grove at top edge for tornavoz.
View of tornavoz installed in grove to test fit. Remove Before assembly.
Neck top joint.
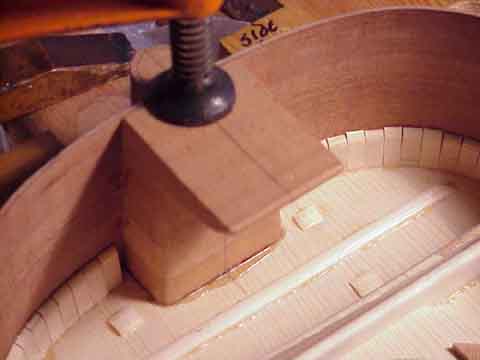
End block clamping.Put waxed paper to protect side form. Woods commonly used for end blocks are pine,spruce,basswood/linden etc. Do not use heavy woods as they add weight to the guitar. You are now ready to glue the liner blocks just put some glue on and press.
Weight the top and put spreaders to hold sides ,then put weight on sides, a board with a brick is good before installing liner blocks.
A night light and long chord with a metal sheild to protect the guitar.This tool is usefill for interior inspection,fitting back, makeing repairs etc.

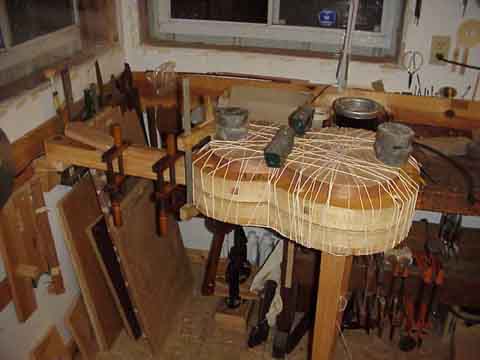
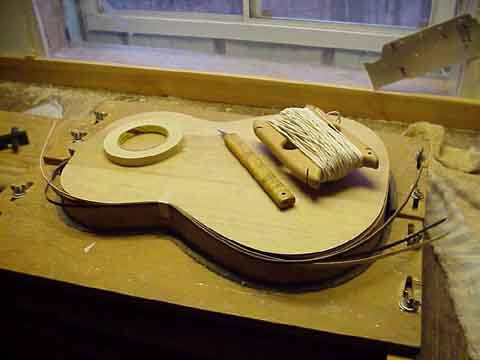
IMPORTANT cut and fit back braces before installing liners,mark the brace ends on the sides of the guitar,for ease in fitting the back.

Liner glueing is easily done with wooden clothes pins,modify the clothes pins to obtain a good fit.Apply glue to both surfaces work fast in warm room.

Glueing of liners completed.
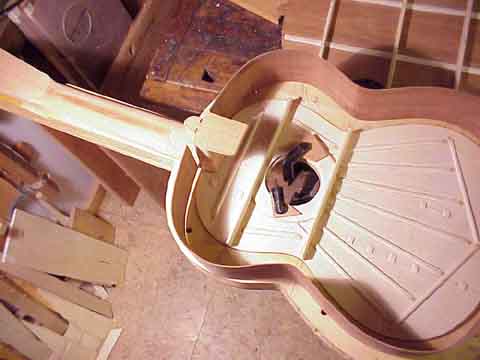
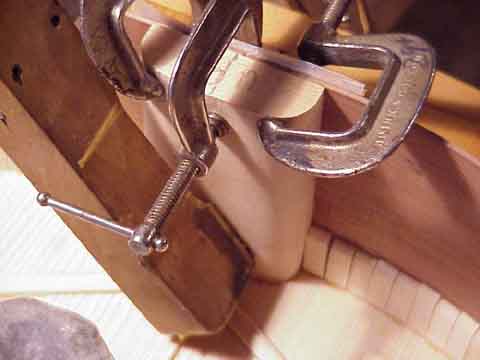
Fitting of the back requires patience. Make certian that the neck and end block and braces fit, remember that the back is not flat, it is curved in all directions.Do not force the top to the sides,plane the sides,end block and neck until the top fits.You have work and time invested ,go slow and think, if things are not going well get a good nights sleep and things will go better when you are rested.
Gluing the back, warm the back and top with a hair dryer and have the room warm. Have your weights and twine ready.coat both surfaces work fast putting extra glue on the neck and end block joint. Weight the neck and end block areas first then weight around the sides use lead or bricks for weight.Try to get the glue surfaces together rapidly,then wrap with twine or leave weights. the twine is wrapped to 3 penney nails driven into the bottom of the solera.
-Banding and Purfeling
Banding and side joint inlay at bottom of the guitar must be installed before the fingerboard. Note the fixture for holding the guitar,it has many uses,banding fretwork,finishing etc. The tools in the image are used for cutting the channel that will receive the banding,a violin purfeling cutter with one blade can be used. A router can also be used to cut the channel ,a special bit for this purpose can be purchased from luthiers supply companies—Stewart Macdonalds-21 N. Schafer St.-Box 900- Athens,Ohio-U.S.A.-45701—–Luthiers Mercantile International-P.O. Box 774-412 Moore Lane- Healdsburg,California-U.S.A.-95448. Using a router will save you time and will do a good job. The banding strips can be made of trimmings from the sides, which are cut oversize by wood suppliers,multi colored veneers are added for a decorative effect. The banding strips are not glued before banding but are fitted and glued in loose,starting at the waist,held by a good quality strong masking tape.The channel to receive the inlay where the sides meet at the bottom should be cut also.
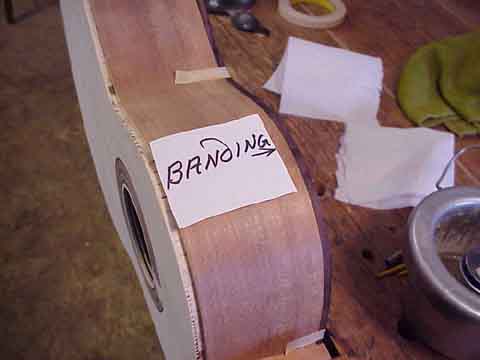
Close up of banding channel and back bandings fitted. The tape at the waist is where you will start glueing. Another method used ,is to glue in binding with a scarf joint ,the banding running past the center line.

Another way to hold the guitar when banding. The guitar neck is clamped in an upright vise or leg vise,a block is made to fit the radius of the back of the neck. Have your tape strips ready,you will need a lot of strips,work fast.
Using the guitar holding fixture. Note the loose banding strips being fitted.The fixture is adjustable,note slots and wing nuts. I strongly advise you to make this fixture as it has many uses, Banding can also be held with twine.
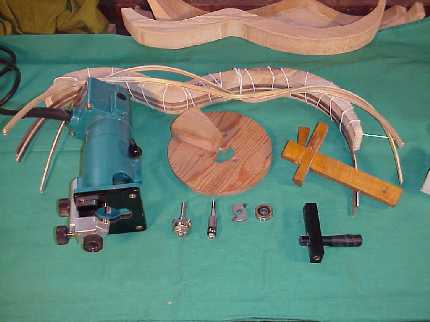
In the above image is a series of tools that can be used to cut the banding channel. Multi colored,glued with hide glue and bent banding strips are also shown. Shown are a Laminate trimmer with roller guide,Router bit for banding cutting with different rollers to allow for different width banding, wooden router plate banding guide,gramils a wood or metal tool for cutting lines in wood. The gramil or cutting guide is the traditional tool . Many old time makers had wooden non adjustable gramils for cutting various widths and height banding channels.
-Fingerboard and Frettboard Gluing, Dress Fretts
Glueing the finger board,before the actual glueing some preperations must be made.the board is thicknessed to about ¼”or as in your plan. The area from the 12th fret to the sound hole must have the fingerboard fitted to it as the curvature of the top and the neck angle make fitting necessary.After the board is fitted (a twist in the board is of no concern as the clamps will remedy this) next you must take some small brads,mark frets 1 and 12 and clamp the fingerboard with the neck/body join and the 12th fret in alignment the 12th fret being exactly above the joint, and with the center of the fingerboard in line with the center line of the guitar and neck. Drill some holes the size of the brads through the fingerboard at 1 and 12 into the neck, the brads will be used to align the fingerboard to the neck to stop slipping whilst glueing drive the brads into the fingerboard leaving the head a little proud of the top of the board. Once the board is ready gather up your clamps and make a test clamping to make certain all is in good order.CAUTION IF YOU HAVE NOT INSTALLED THE BANDING STOP NOW AND DO IT !!

Ready to glue fingerboard, again I repeat have all in readyness warm the neck and fingerboard- IMPORNTANT-wet the side that does not receive glue to counteract the moisture in the glue and stop warping DO NOT WET THE GLUE SIDE. Apply the glue with a natural bristle 1″brush with hair cut short leaving ¾”, dipped in hot water from your glue pot and squeezed out. Make certain the wood is warm,apply glue to fingerboard and neck/top area,line up the brads press fingerboard and nails onto neck and top,clamp quickly,put small clamps to clamp fingerboard end at the sound hole. I like to cut the fingerboard off in advance at the sound hole leaving it a little long for rasping to conforme to the soundhole radius. Go over your clamps and see that they are all squeezing out glue,bring them up tight. Let the glue squeeze out jell a bit and remove it from the edge of the fingerboard/top join using a narrow thin piece of wood,then with a damp warm cloth wipe the area. It is done. Now you must wait at least a week to allow the moisture to leave and the neck and board to settle.
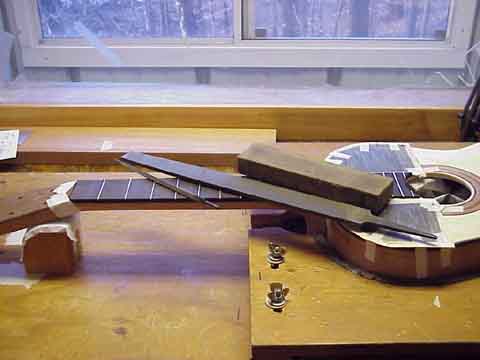
Plane the fingerboard, you have waited a week and busied yourself with other things and now you are ready to plane the fingerboard. Get a straight edge and plane away any irregularities using a very sharp ,low angle block plane,takeing fine cuts until straight. If your neck set is correct there will be little to plane. Now to compensate for the pull of the strings put a block to support the neck at the area of the nut, press in the middle of the span between the nut and the twelfth fret. Observe using a straight edge how much deflection there is. Next take your fine set plane and plane away from the center point in both directions to achieve a 1/64 crown in center press again using about 10lbs. pressure,repeat until straight. This takes experience so go slow. Finish the board with a scraper and fine sand paper leaving the edges square.There will be a slight crown is the center, this will go away when string tension is applied.
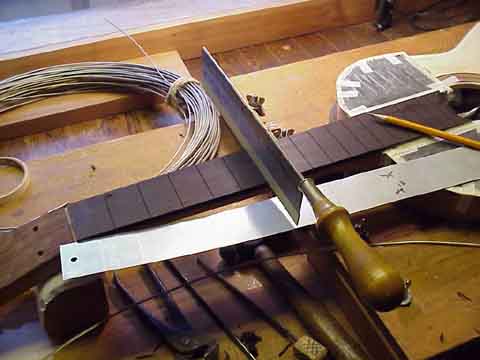
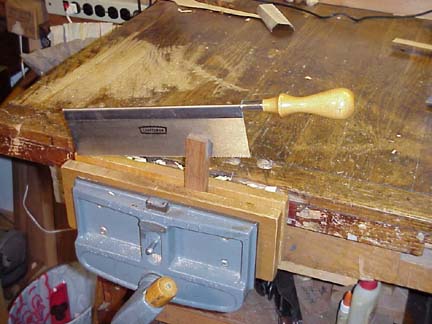
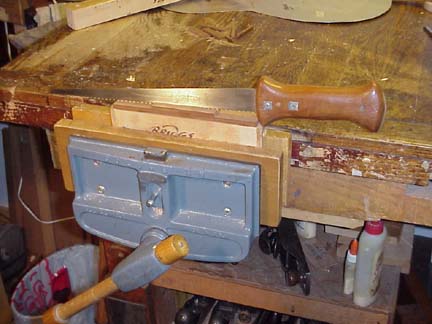
Layout and sawing the fret slots, make yourself a template of the fret scale from nut to saddle. Clamp the fret scale to the fingerboard and mark the positions with a sharp pencil remove the template and mark each fret with a sharp knife.Now get a dovetail saw as in the image a Disston dovetail saw is a good saw,the kerf will be too wide,you will have to take a wet stone to the sides of the teeth removing the set until the kerf fits the T section snugly but not tight. If the frets are driven into a tight slot the neck will be forced backwards also the frets will be distorted.
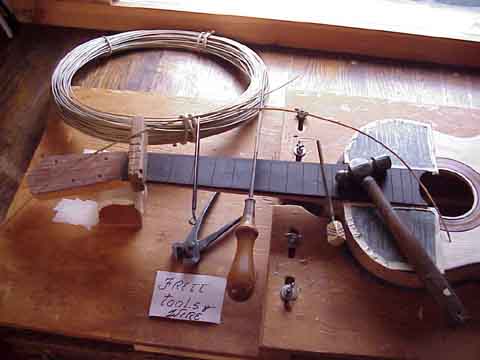
Sawing the fret slots, take your fret saw and mark the slot depth by putting masking tape to act as a guage,rub some pariffin on the saw teeth, take a scrap of hardwood and practice cutting slots and installing frets.Look into the image at the tools,upper left a coil of fret wire, upper right notice the sheet iron guards to protect the top,middle the saw with tape, lower left a nippers ground sharp to to remove frets and files.
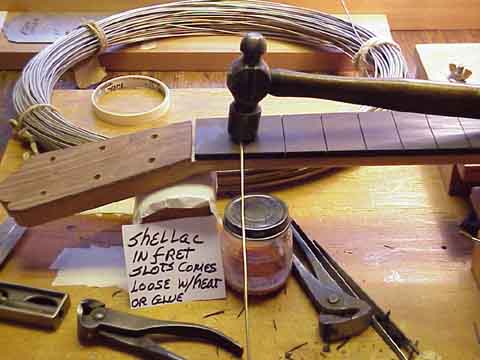
Install the frets,take a strip of fret wire straighten it check that the T section is not distorted get a block of ¾” hard wood and saw a fret slot in it. Put the fret end in the slot in the wood block and file a bevel on it. Now run a little glue or shellac in the slot and wipe with a damp cloth,install the fret pressing and hammering gently starting at the ends. When the fret is bedded take a small three corner file and file until you can remove the fret wire. Go over the fret and make sure it is bedded,wipe away glue with a damp cloth dry the board and take a piece of strong ½”masking tape and tape over the fret pressing down the tape hard. Continue until the fingerboard is fretted.
Finishing the frets,let everything dry and remove the tape.Get a large fine cut file,when buying the file make sure the file is straight many are warped from the heat treating process. File gently in one direction from the sound hole towards the nut keep moving the file to avoid one area from excessive fileing . When all the fret tops are hit you are done (remember not to file away the crown in the fingerboard).Next file the fret edges uniformly as well as the short frets at the soundhole. Now get a slim taper saw filers file as in image and grind away one of the three edges polish the ground edge until smooth Put some masking tape on the flat opposite the ground edge. File along the long axis of the frets rounding the fret almost to the flat made by the large flat fille and dress the fret edges removing all burrs.Next run a wetstone from soundhole to nut. Then take a piece of fine sandpaper and go over the frets. Finish by wiping with a damp cloth and let dry this produces a satin finish not a slippery one.
-Finishing the heel and neck
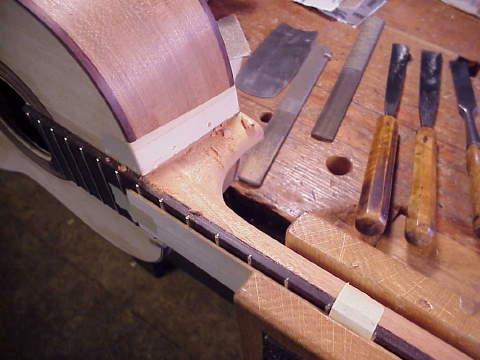
Finishing the heel and neck should be done with care to not mar the sides and fingerboard. The neck is left oversized in construction and now requires to be brought to final dimensions. Protect the sides with masking tape. The rasps you will use should have the ends smoothed and polished so they will not damage the sides. Use chisel and rasps to carve close to finish dimensions taking care not to rasp the fingerboard too deep. Next finish with cabinet scrapers and sandpaper. Drill the peg holes or fit the machine heads if you haven’t already done this. Proceed with caution as you already have many hours of work invested in your instrument.
I would like to recommend some books about wood finishing that will help you. The first is – Staining and Polishing, edited by, Charles H Hayward, J.B.Lippincott Company, Philidelphia and New York,Printed in Great Britian. Next is Understanding Wood Finishing by Bob Flexener, Published by Rodale Press, Emmaus, Pennsylvania, Printed in the United States of America. These books have chapters describing the French Polishing process and other useful information. Staining and Polishing is a documentation of traditional English finishing processes. Understanding Wood Finishing broaches modern techniques also. The internet also has sites about French polishing and surface preperation study them.
A good wood filler was recently recommended to me by the well known American guitar maker Robert Ruck the filler is Elmers Carpenters Interior Wood Filler. Color can be added to this filler at your hardware store if they mix paint. Test all fillers on scrap wood before using on your guitar. Pumice and plaster of paris are also used as fillers.
At the end of the forgoing steps you will damp off the guitar to achieve a dead surface to apply the French polish. Damping off entails applying warm moisture with a soft rag dipped in hot water,wrung out and applied to the surface of the guitar in order to raise the grain. When the guitar is dry sand with fine sandpaper and damp off again. Repeat this until the grain no longer raises.

Leveling the back and sides is easily done with scrapers and sandpaper. It will be easier if you make holding fixtures so the guitar does not move. When working on the back make a long strip of wood that fits the top as in the image to keep the guitar steady and protect the top/ The height of the strip should be thick enough that the fingerboard and the strip sre on the same plane. Round or chamfer the banding edges so you do not dig into the banding when scraping. Do not use excessive pressure as there is a danger of cracking the back or top. Put a soft cloth under the guitar to protect the guitar. See Chapter 0 for sharpening instructions. After the back and sides are scraped sand with medium to fine sandpaper. Many ancient makers finished the surface with scrapers using little abrasives. If you are allergic scraping will enable you to avoid sanding dust. Remember that the corners of your scrapers must be slightly rounded to avoid digging in.
Leveling the back and sides is easily done with scrapers and sandpaper. It will be easier if you make holding fixtures so the guitar does not move. When working on the back make a long strip of wood that fits the top as in the image to keep the guitar steady and protect the top/ The height of the strip should be thick enough that the fingerboard and the strip sre on the same plane. Round or chamfer the banding edges so you do not dig into the banding when scraping. Do not use excessive pressure as there is a danger of cracking the back or top. Put a soft cloth under the guitar to protect the guitar. See Chapter 0 for sharpening instructions. After the back and sides are scraped sand with medium to fine sandpaper. Many ancient makers finished the surface with scrapers using little abrasives. If you are allergic scraping will enable you to avoid sanding dust. Remember that the corners of your scrapers must be slightly rounded to avoid digging in.
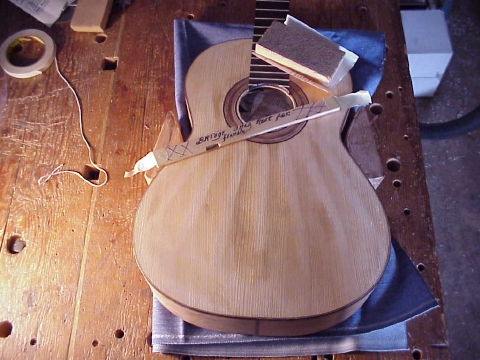
Surfacing the top is done in the same manner as the back but requires a lighter touch, as the wood is softer. Notice in the image that the fan braces are visible due to shrinkage of the glue joint. These undulations are usually removed in the scraping and sanding process. I prefer to leave a little of the fans show on the top. When gluing the bridge using a caul underneath the, top the top will level

Fitting the pegs and machine heads should be done now if you haven’t already done this. Pegs should be fitted allowing for a little extra fitting after the French polish is done. The reason for this is a little polish or oil may get into the peg hole and cause binding etc. Now is a good time to check that the peg head is finished properly.
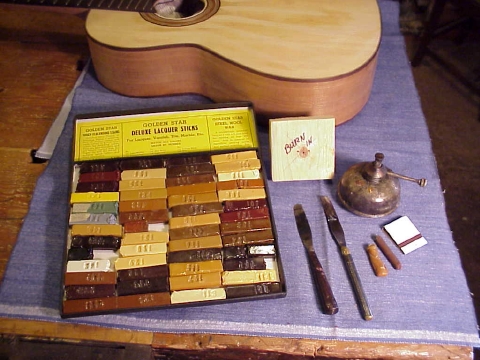
Correcting defects and filling is now required. In the case of very small defects in glue joints a little hot hide glue will fill these in. Burning in with shellac stick of the correct color will fill larger errors. Shellac stick, spirit lamps and palate knives can be purchased from woodworking supply houses. Large defects may require the careful inlay of matching wood. When burning in heat the tool and clean it on a block of wood, then hold it over the spirit lamp flame until the shellac melts. Then with a flowing motion, apply the melted shellac into the defect. Wet your finger with saliva and quickly press the shellac into the void. Repeat, if necessary. Level the repair with a sharp chisel,scraper and sandpaper. Now damp off and filling if necessary is next. Filling – French polish can be used to fill the grain but fillers are usually used to save time. Plaster of Paris tinted to match is a traditional filler, first put a couple of coats of thin French polish on the wood. Next mix the plaster of Paris to the consistency of cream apply the plaster of Paris to the back of the guitar. Let it set for a little and wipe across the grain to level additional applications may be required. When the entire guitar is done take a little boiled linseed oil on a cloth and apply to the guitar. This takes the whiteness out of the Plaster of Paris. Rub with a soft cloth, sand lightly and you are ready to start polishing. Caution! Do not use a rag that has been used on tinted woods on light colored woods, use a new rag. Many ancient guitars will show the plaster of Paris filler. Pumice is put on the surface to be French polished and with the fad and shellac start working the pumice into the pours. A pounce bag is often used but filling can be done without. Use flour grade or fine pumice. Robert Ruck has recommended Elmers, Carpenters Interior Wood Filler tinting as necessary.
French Poslihing

A fixture to hold the guitar while French polishing will make things easier. Due to the awkward nature of holding the guitar while French polishing I invented this omni directional guitar holding fixture. After French polishing since 1957 I thought it was time to make things easier. As you can see the guitar can be rotated without the hands having to touch the surface. The top, sides ,heel and peg head can be polished and all that remains after removal from the fixture is part of the neck. This fixture can also be used for rubbing out other finishes and while doing repairs.

To give stability, to the guitar while French polishing a 11/2” x 11/2 “ piece of soft wood about 12” long with cloth tied to the end to act as a cushion should be made. This support when needed is held in the sound hole. The beer is to give strength to the French polisher.
Bridge Making
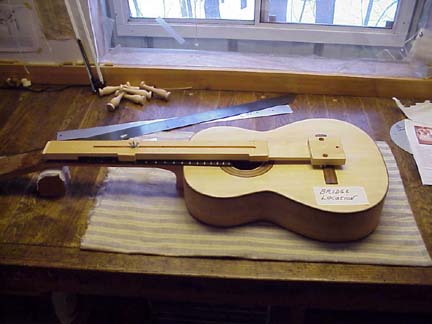
Locate the position of the bridge, using a straight edge establish the center of the bridge on the top. The center of the bridge is controlled by the center of the fingerboard. Mark the center of the fingerboard at the nut and the bottom of the fingerboard at the sound hole. Now take the straight edge and mark the center of the bridge at the point of the bridge saddle on the top. Make this mark lightly. Now with your bridge template lightly mark the area of the bridge. Remember to move, the template towards the fingerboard so that the bridge saddle point meets the saddle point of your scale template. Mark the corners of the template lightly.

Fit Bridge to the top. The bridge should fit the top without forceing it to conform to the domeing of the top. To force the fit will stress the top and inhibit sound production. I prefer to fit each bridge individually to insure a good joint and a top that if free to vibrate. Bridge materials commonly used are ebony or rosewood, rosewood being the most common type used for classical and flamenco guitars. My preference for the angle of the grain of the bridge is vertical or slightly angled. Cut the bridge blank to the size given in the plans and ½” or more in thickness, the extra thickness allows for fitting to the top. Put a piece of paper on the top and scribe the arc on the bridge on both sides
Using a draw shave,rasp and cabinet scraper create the curve to fit the domeing of the top. Now tape a piece of 120 sandpaper to the top and at the location of the bridge, place the curved bridge blank and sand gently with short strokes in the direction of the fingerboard. Do until you have a good fit.
Layout the cuts to be made on the bridge blank from your bridge template. Remove the wood from the wings of the bridge first, leave a little extra for the final rasping and sanding.
Using the saw you made for the neck side joint cut the slot for the saddle and for the low area where the strings come out.
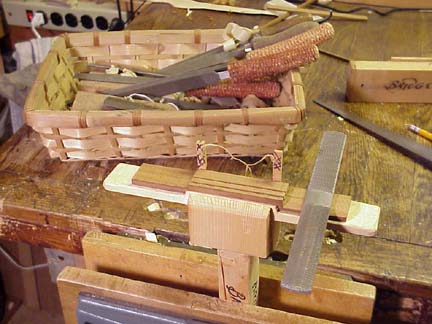
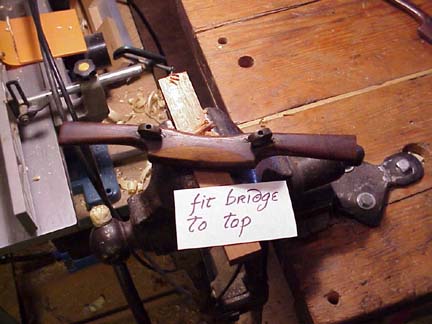
Now make a fixture for holding the bridge while shaping as in image. Rasp the contours and bevels of the bridge. Plane down the tie block finish the string to saddle area etc.

Another view of the bridge holding fixture.
Drilling the string holes, make yourself a curved block to fit the bottom of the bridge to use for clamping the bridge while drilling. Before drilling the holes check to see if you have sufficient margins on the fingerboard. It is possible to have accidentally made the fingerboard a little narrow. If this is the case alter the string spacing at the bridge. When you are satisfied that your string spacing is correct mark the location of the string holes using the center of the bridge for location. Now drill the hole with a number 50 drill. Mark the depth you have to drill with masking tape on the drill. Run a low E string through the holes to clean them out and if they string does not enter smoothly remove a little wood, the string must feed in easily. Sand and clean up and you are ready for the tie block facing.
Facing the tie block, Torres used a thin facing of ivory, possibly piano key ivory. Plane the tie block level and check its height. Make a caul and face it with cork cut your ivory or bone facing slightly oversize and glue it on. Trim it up when the glue is dry finish sand and put French polish or other type of finish on the bridge. Mask the bottom of the bridge, always take care not to get oil or grease on the bottom of the bridge.
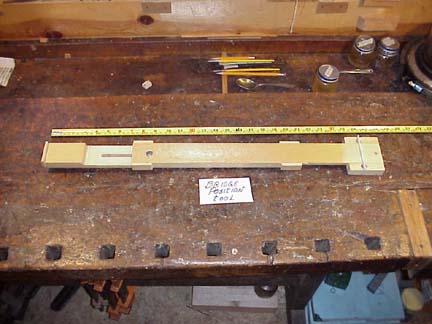
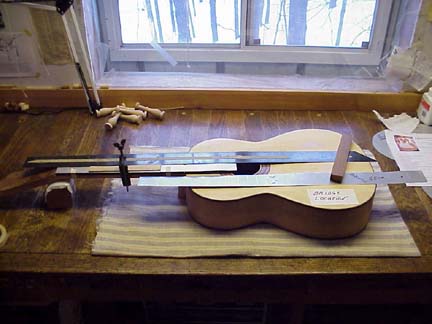
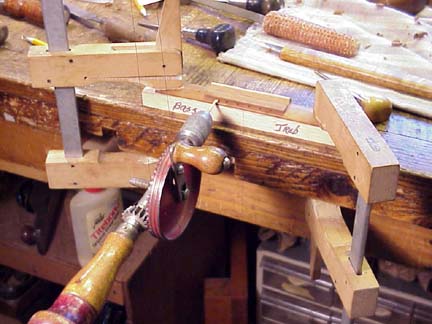
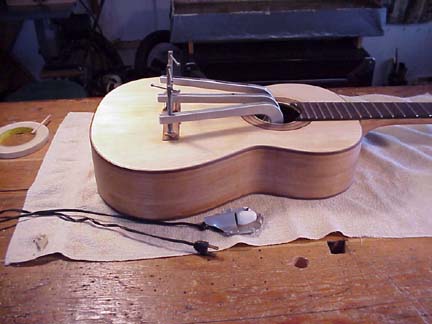
A bridge locating fixture is handy for locating bridges, set it to the scale length, the fixture has a saddle in it which fits into the slot on the bridge. When you have your bridge positioned drill a hole through the bridge and top at each end of the bridge saddle slot to receive a brad to use in locating the bridge while glueing. CAUTION do not drill through a fan brace. Bridges tend to slip when glueing. I recommend that you do something to avoid this. In the beginningI held the bridge for a half hour with my hand inside the guitar and the other hand pushing on the bridge-SILLY.
View of bridge locating fixture in use.
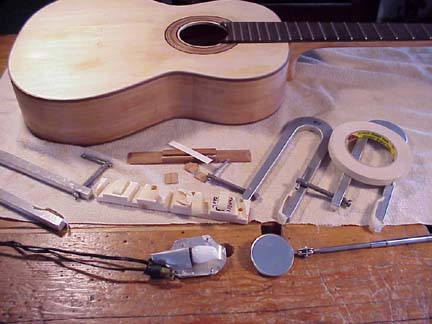
Tools used to glue a bridge, from left clamp, caul to be used with the clamp method with slots cut to receive fan braces and curved to fit the bridge curve. The caul is held to the underside of the top with double stick tape or masking tape in a circle. Below left an inspection light, notice the shield which avoids burning the finish in case it is accidentally left in the guitar too long. To the right is an inspection mirror.
Clamps in use, with caul under the top. Clean away all glue squeeze out with a warm damp cloth and clean the string holes with a guitar string. Another way to keep the glue out of the string holes is to force a little paste wax in them DO NOT get wax on the bottom or glue surface of the bridge, glue does not stick to waxed or oily surfaces. Many of the old guitar makers scratched or roughed up the surface to be glued a hack saw blade works well.

Another method of glueing the bridge. This method uses no caul just the pressure of the twine and wedges.
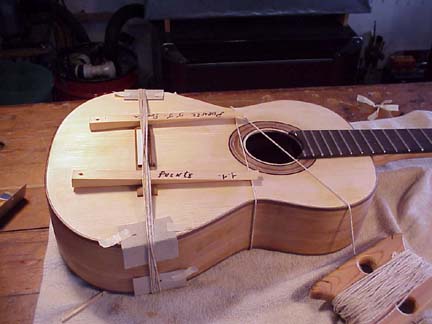
A simple wrap of twine and wedges inserted to apply pressure. The top will rebound after the glue is dry and the pressure is removed.
http://myplace.frontier.com/~nostberg/


