

Tools and Supplies for Building the Tiled Rosette
By Liutaio Mottola
- Joined guitar top plate
- Rosette tiles
- Purfling lines
- Small router with circle cutting baseplate attachment, or
- Hobby knife blade, chisel
- Liquid hide glue (not hot hide glue) or white glue
- Wax paper
- Masking tape
- Knife
- Block plane
- Scraper
- Compass
- A flat workboard
- Clamps
- Razor saw
Designing the Rosette
Complete instructions for designing a rosette from scratch are beyond the scope of this page, but a few general pointers will help those that want to tackle this. The inner edge of the rosette is generally about 0.125” or 3mm from the edge of the soundhole. The rosette can be a wide as you like, and there is a lot of variation in rosette width in conventional instruments. Beginners should keep in mind that it is more difficult to glue in all the purling lines and tiles in a really wide rosette, and may want to opt for one which is thinner and more manageable. When considering the width of the rosette, you should also consider the width of the tiles that will be used and the width of the various purfling lines you will use to border the tiles. As the tiles and purfling lines are generally made of wood or wood fiber and will expand a bit when wet with glue, you should also leave a bit of space for expansion when dimensioning the rosette. For a conventionally sized rosette, less than the thickness of the thinnest purfling line (about 0.03”) is generally enough space to leave for swelling, but the actual amount needed will depend on just how many purfling lines you will use in your design – the more lines, the more space you should leave for swelling. I am not providing hard and fast rules here, and if you make the same design over and over you will soon hit upon a good expansion allowance.
The general layout of a conventional rosette has a single ring of tiles bordered on both sides by rings of purfling stripes. Generally the pattern of the stripes on one side of the tiles mirrors that on the other. If you want to use composite purfling strips in your design, you should check to see if they can be bent cold into a circle of the radius needed for the design. If they can’t they should be pre-bent by soaking them in hot water for a few seconds and then forced into a mold made by routing a ring shaped channel into a piece of plastic with a router.
Laying out the Rosette and Soundhole
In a conventional instrument the centers of the rosette and the soundhole are concentric, so layout begins by locating the center of the sound hole. Usually this is taken directly from the instrument plan, measured down the centerline of the instrument from the point at which the body meets the neck. The radius of the soundhole and those of the inner and outer limits of the rosette are measured from the plan and then transferred one at a time to the compass:
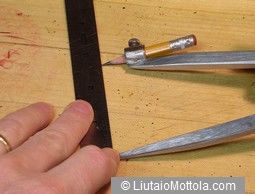
Then the compass is used to draw these circles onto the front surface of the top plate:

It is a good idea to mark the top to indicate where the fingerboard extension will end up. We do this to be sure we keep all the “loose ends” of the rosette where they will be covered up in the finished instrument.
Excavating the Rosette Pocket
There are three basic approaches to excavating the pocket for the rosette. A small router with a circle cutter base can be used, or the edges of the pocket can be cut with a circular cutting gauge and then the pocket can be excavated using a chisel, or the edges of the pocket can be cut with a circular cutting gauge and then the pocket can be excavated using a router. The latter method leaves the cleanest edges and cleanest floor of the pocket. I am going to use the router only method in most of the instruments on this page, but I’ll show how to make and use a circular cutting gauge for cutting out the soundhole. This should be enough so that anyone that wants to use the cut and chisel or the cut and route approach has enough information to figure out how to do what they want to do.
I’m using a hobby grinder and a router base for it, and also a special circle cutter attachment for the router base. The base and circle cutter are available from lutherie suppliers. The hobby grinder generally doesn’t make for such a good router, but in this application it works just fine. Note that there are other approaches that could be used – you could build a circle cutter base for a laminate trimmer or other small router for example. It is even possible that you could use a circle cutter attachment for a general purpose router, but if you intend to go this route be sure the attachment can cut the small radius circles needed in this application. Also, whatever scheme you use, be sure your circle cutting hardware can hold tight tolerances for the radius of the circle.
The circle cutter attachment moves around a pin. The one I’m using is 3/16” in diameter. The first step is to clamp the top face up to a workboard, and then drill a blind 3/16” hole through the top and into the workboard at the center of the soundhole and the rosette. The pin is then inserted in the hole.

By the way, if you are using a shop built jig for this job and don’t have drill rod handy to make a pin, you can usually just use the drill bit that you drilled the hole with as a pin. Stick the bit in the hole back end first.
Please note that the top will remain clamped to the work board throughout the process of building the rosette.
I’m using a 3/8” diameter bit in the hobby grinder, which will excavate even a wide rosette cavity in a few passes. Insert the bit, then adjust the depth of cut to be the thickness of the top, minus a little bit. You want to make a pocket, not a through cut, and you’d like the pocket to be as deep as possible while still having a stable floor, but not deeper than the purfling lines and tiles you are going to install.
After the depth of cut is set, the router with circle cutter is placed on the pin and then the circle cutter is adjusted for the radius of the first cut. Adjust it so the bit is in the middle of the pocket you’ll cut, not near either of the edges.

The cut should be started on or near the centerline at the neck end, in that area of the top that will be covered up by the fingerboard extension in the finished instrument. This way any wobbliness in the plunge will not be seen in the finished instrument. Lift the router a little so the bit is not touching the top, turn it on, then sit it down to plunge the bit into the top. Move it clockwise a bit, then stop the router and lift it up so you can assess the cut. If it is too deep, adjust the depth as needed and try again. When you are satisfied with the depth of cut, position the router for the plunge as before, turn the router on, plunge, then move the router smoothly in a clockwise direction to route the first pass on the pocket.
The circle cutter is then adjusted to take another cut, moving the bit closer to either the inside or the outside edge of the rosette pocket. The steps above are repeated to cut the next pass. At this point you want to get close to, but not right up on top of the lines that mark the inside and outside boundaries. Repeat until the entire pocket is roughly routed out, near to but not right on the lines.
The final cuts are made to get the cutter right up to the marked lines. Doing this is finicky work and will require you to make fine adjustments to the circle cutter’s radius. When routing to the outside edge of the pocket, the router should be rotated around the pin in a clockwise direction, to avoid a climbing cut. When routing to the inside edge, move the router in a counter clockwise direction. Make short test cuts in the area that will be covered by the fingerboard extension, to be sure you are not cutting over either line. When you are done the pocket should look like this:

I like to make my last cut be on the outer edge of the pocket. Notice in the closeup that the edges are left kind of fuzzy where the router was cutting across end grain. You can cut this fringe off with a sharp knife, but I generally don’t recommend doing so – it is too easy to bung up the edge of the pocket. Don’t pull on or try to scrape the fuzz off! It is well attached to the top (after all, it was beat on by a sharp router bit a few hundred times already) and if you pull it up you’ll just pull a hunk out of the top which may be difficult to sand or scrape away later. If the rough edges bother you a lot, the best approach to use to route the pocket is to first cut the edges using a circular cutting gauge (explained below) and then route out the pocket. The gauge leaves nice clean edges.
Dry Fitting the Tiles and Purfling Lines
We dry fit the tiles and lines for two reasons. The first is we want to be sure everything actually fits and fits well. We’d like to find this out before we have glue all over everything, since it is easier to make changes and corrections then. The second reason is that we want to have some idea of how we are going to sequence the operation of assembly, again, before we’ve got wet glue to deal with.
The purfling lines you will be using should be cut a bit longer than they need to be to fit in their places in the rosette. The rosette pattern will have an inner band and an outer band of purfling lines, and it makes it a lot easier to handle all these lines if you stack the lines for each band up in order and then tape them together at one end with a very small piece of masking tape. Don’t over do it with the tape – you want just enough to hold the lines reliably together, but not so much that you require major tools to get it off later during gluing.
In theory, the outer band of lines can be positioned around inside the pocket and the springiness of the lines will hold them in place. Unfortunately, that’s only in theory. In reality, nothing will stay in place during dry fitting unless everything that is going into the pocket is placed into the pocket.
Both bundles of purfling lines should be positioned near to the pocket with the taped ends near the centerline at the neck end. If you are using small tiles like the traditional classical guitar mosaic tiles, you start by placing the first tile in position near where the edge of the fingerboard will be, but so it will be mostly covered up by the fingerboard extension. Work the bundles of purfling lines into the pocket too, so that they get wedged in place by the tile. The basic operation goes like this: Push both of the purfling line bundles to their respective sides of the pocket with the fingers of one hand, then place a tile between them with the other hand. You need to do this in such as way that you can hold everything in place with a finger, and then place the next tile in, smack up against the first one. Continue around until you are back inside the other edge of the fingerboard. This operation takes some time to master, but do it as often as you need to get it right. It is a lot easier to learn now than it is when there is also wet glue to deal with.
As mentioned, we dry fit not only to get a handle on how we are going to proceed when it comes time to actually glue, but also to assess the fit of the components in the pocket. If the purfling line bundles and the tiles just won’t fit or if the fit is tight, the pocket is too small and will have to be enlarged. If you haven’t readjusted the circle cutter used to cut out the pocket and if you have routed the outside edge of the pocket last, it is often possible to take off just a bit more of the outside edge of the pocket by simply repositioning the router and taking one or two careful climb cut passes on the outside edge again. If that doesn’t work the circle cutter will have to be carefully adjusted to enlarge the pocket on the outside edge just a hair, and then route again. We do all this on the outside edge because we don’t want to make the space between the inside edge of the rosette and what will be the edge of the soundhole any smaller.
Once again, we want everything to fit with a just a little bit of slop (less than 0.03”), that is, less than the thickness of a single average purfling line. You can eyeball this when you are dry fitting by pushing on a tile to slide it toward one edge of the pocket and see what kind of a gap you get. If it looks less than the thickness of a purfling line, then all is well. If it is greater than that, the best bet is to simply add another purfling line to your pattern. An extra line on either of the edges that is the same color as the line you intended to go there is a good way to go. Only folks that are actually looking for this will ever see it in the final rosette. By the way, you should not brow beat yourself if you have to insert an extra line on a one up, hand built instrument. Doing so will put you in the company of some of the greatest guitar builders of all time.
The rosette I’m making in the picture uses very big tiles, and I want to be sure the bottom one is centered on the centerline of the guitar. In that case, rather than start tiling under the fingerboard extension, I start tiling at the centerline at the tail end of the pocket. But of course the purfling bundles have to be positioned so their loose ends will end up under the fingerboard extension. It helps to have three hands to do this, but it can be done with two with some practice. Here is a picture of my dry fitting:

Notice that we don’t tile right up to the centerline at the neck end. We don’t want to waste hard-to-make tiles for this purpose since the fingerboard extension will cover this part of the pocket in the finished instrument. Later, after the tiles and purfling are glued in, this space will be filled by a blank piece of wood.
Gluing the Tiles and Purfling Lines
When you are comfortable with the procedure for placing the tiles and purfling line bundles it is time to actually glue them into the pocket. Start by taking the dry fitted tiles out one by one and putting them next to the pocket, ready to be inserted. If it helps you to keep the purfling bundles in place, you can leave one tile in at this time. That one will be removed and reinstalled as the first step of the gluing process.
There is an important concept I would like to introduce at this point called mise en place (pronounced: MEEZ ahn plahs). The words are French, and they describe how French chefs set themselves up to prepare for serious cooking. The words mean literally “putting in place.” Since the act of cooking itself must be done in real time, and since preparing for cooking can be done over however much time it takes to do it, chefs divide the activity into two types of work, generally called prep work and line work. The upshot of all of this is that you do all the tasks that are not time critical well before you do the time critical tasks so that when it comes time to cook the only thing you have to concern yourself with is cooking.
In lutherie we have a similar situation when it comes to complex gluing operations (and also some finishing operations). The glue dries in a fixed amount of time and so, when we are gluing things, we want to devote all our attention to gluing alone. To accomplish this, we have to have everything we need for the gluing operation be ready and at hand before we begin. This seems like such a simple thing once you hear about it, but it makes such a big difference to one’s ability to perform tricky time critical lutherie operations with ease. I first observed this in the context of finishing, as done by the masterful French polisher (and my American Lutherie colleague) Cyndy Burton.
So, the basic deal here is, have everything you need to do the gluing operation right at hand, right on the bench:

In the picture I’ve got a container of warm water, paper towels, glue, rags, a glue container and glue brush, a knife, and some masking tape, as well as the top, tiles and purfling bundles ready to go.
I strongly advise the use of either bottled liquid hide glue (not hot hide glue) or white glue for this operation. These two glues are generally not used much in lutherie, but it is a good idea to chose glue based on the properties you need in it for a particular operation, and for this particular operation the property we need most is a long open time, that is, that the glue doesn’t dry or stiffen up too fast. Both of these glues provide this. I prefer the liquid hide glue, but note that this glue does not have a very long shelf life so be sure to use glue that has not exceeded its expiration date.
The first step is to thin out the glue with a little water in a small cup. About 4 parts glue to 1 part water works well but the ratio is not critical. Next, smear some glue on the floor and walls of the pocket where the first tile will go. If you’ve left that tile in to hold things in place, temporarily remove it, apply glue, then reinsert the tile.
The purfling lines near the inserted tile are pulled away from the walls of the pocket a bit and then fanned a bit with the fingers and then brushed with glue and put back in place. Then the floor of the pocket is brushed with glue and the next tile is placed right next to the first one. This process is continued around the pocket until all tiles are inserted. As you get near to the ends of the purfling bundles that are taped, the lines may start to skew a bit. If this happens remove the tape so the lines can lay flat. You must be very careful that all the tiles and all the lines are set all the way into the pocket, and even more careful that no lines end up submerged under other lines or the tiles. If there is too much glue around for you to see clearly, clean things up a bit with a wet piece of paper towel so you can take a better look. You can also clean up your hands if things just get too sticky to work, but in general this is not the time for any fastidious cleanup.
If you find any problems with gaps between tiles or submerged purfling lines, fix them as soon as you can. The small knife is an invaluable tool for lifting tiles and lines out of the pocket. If the glue begins to set up on you, thin it out with a little more water.
When you are all done it is a good idea to wipe off any excess glue and do a final assessment for problems. Try to get all the glue out of the pocket that remains untiled – we’ll need to put a filler piece in here eventually, and it helps if this place is clear of glue. If everything is fine, you can use your fingers or the butt end of the knife or a screwdriver to do a final pressing of the tiles and lines into place. If you find some catastrophe but the glue is still workable, you can still possibly lift tiles and bundles to try again. But if things are starting to set up and you can’t try again, the best bet is to pull everything and wash out the pocket and wash off the tiles for another attempt later on. The purfling bundles probably can’t be reused but these are fairly cheap and so no great loss.
Let the glue dry before doing any other work. I like to put a piece of wax paper over the rosette and then apply a weight to keep everything in place. Here I’m using a 10 lb barbell plate to weight things down:

After the glue is dry, the untiled place in the pocket that will be under the fingerboard is filled with a small piece of hardwood. Trim the ends of the purfling line bundles off flush with the edges of the end tiles using a knife. Then fashion a filler piece out of hardwood veneer (a cutoff from a back or side works well) to approximately fill the space and glue it in. There is not a lot of need for a precision fit here – the filler will be covered by the fingerboard in the finished instrument. Just make it fit well enough so that it won’t catch the edge of the plane and scraper during subsequent planing and scraping operations.
The tiles I am using in the picture are cut out using a CNC machine. When I’m making the tiles I also make an overly long filler tile which can be trimmed to length. This piece is seen in some of the photos above.

Planing and Scraping
When the glue is dry the finished rosette can be planed and scraped flush with the top surface of the plate. A sharp, finely set block plane works fine for the planing.

Move the plane around in a radial fashion as you plane, keeping it angled to the direction of cut so you don’t run straight into any of the joints between the tiles. Before you start planing and even after you first begin, the rosette will look pretty funky, what with glue all over it and the different pieces all at slightly different levels. But once the plane starts to take off smooth ribbons rather than little chips, the rosette begins to look pretty good. On the other hand, any assembly flaws will now stick out like a sore thumb. It is reasonable to assess your work once again at this time as the top is still clamped to the workboard, the center pin is still in place, and it is still relatively simple to route out everything that’s there and start over again. It is never pleasant to have to take a step backward like this, but this is the time to consider it.
Don’t plane right down to the surface of the top – it is too easy to tear a big chunk out of the top itself if the corner of the blade catches the top. Plane nearly flush, and then switch to a sharp scraper.

Be careful to avoid gouging the top with the sharp corners of the scraper, too! On the other hand, you don’t want to flex the scraper so much that you create a hollow area in the top around the rosette.
Cutting out the Soundhole
The soundhole can be cut out using the same router and circle cutter used to cut the rosette pocket, or you can use a fly cutter on the drill press. Here I will show how to cut it out using a shop built throw away circular cutting gauge. As mentioned, this same type of cutting gauge can be used to cut the edges of the rosette pocket so that the waste can then be removed with either router or chisel. For the instructions following, the top is still clamped to the workboard and the center pin is still in place.
The circular cutting gauge is the simplest of tools. I first learned about it from luthier, guitarist and professor James Buckland, who makes stunning 19th century style guitars using 19th century guitar making techniques. My version uses a scrap of spruce from a guitar top cutoff. Drill a hole near one end that is the same diameter as the center pin. Then drive the tip of a hobby knife blade through the scrap with a hammer.

The depth of cut is adjusted by how much of the tip of the blade is exposed. For the purposes of cutting out the sound hole the exposed tip is long enough to cut right through the top. Here’s a view of the cutter mounted on the center pin:

The tool is very easy to use. Mount it on the pin, then push it around in a circle. Take light cuts, increasing the depth each time around.

You’ll find that the blade naturally sinks in deeper when it is cutting with the grain. It is a good idea to not let it sink in too deep for any pass because then it will try to follow the grain at that point. Keep the cuts uniformly light, and the cut will be made cleanly with not too many passes.

All the tasks of building the tiled rosette and cutting out the soundhole are now done, but it is a good idea to once again assess your work before unclamping the top from the workboard. At this point you still have that nice pin oriented right smack in the center of the rosette and soundhole, but once you remove the clamps, finding the exact center again could be a real problem. So take a good look now, and when you are satisfied that the center pin is no longer needed, the top can be removed from the workboard.
http://liutaiomottola.com/construction/TiledRosette.htm


