
by Neil Ostberg
This statement will bear keeping in mind, how you treat your woods during construction is more important than using rare and costly woods. There are many instruments on the planet built of the finest wood available that lack good sound. For a beginner common sense dictates that you cut your teeth on common woods. Proof of this statement is as follows—-woods in instruments that are still in use built by Antonio Torres and Guarneri Del Gesu seldom were first class but their skill in construction gave them the ability to produce quality sound. They understood how to spring the wood to make an efficient box to move the air. for example the fan braces on a classical guitar top become springs when locked into the parabolic dish of the solera (work board) . The pattern of the fan braces is not as critical as their springing and shape, proof of this is the many guitars in existence producing good sound with different fan brace patterns ,and the many great builders of our time who are constantly changing their patterns with and producing good sound. The violin in its arches which act as springs and its base bar which acts in concert with the sound post to move the top and back plates to effectively move air is another but different example of springing. The manner in which the plates are graduated the shape of the curvature of the plates is treated, the shape of the body and the air chamber it produces have an effect on the finished sound— basic dimensions have evolved through trial and error down through the centuries these dimensions work and that is why Antonio de Torres style of construction is emulated in this series. To attempt to build in the style of Torres would have been impossible for me save for the wonderful times we live in. The book Antonio de Torres guitar maker –his life and work –by Jose l. Romanillos was given to me by Robert Ruck guitar maker this planted the seed. I proceeded to enlarge the plans from Romanillos book to create a plantilla (p/an). Hence forth all of you have Mr. Romanillos to thank for his great book which I recommend you read. The guild of American Luthiers publication series —American Lutherie number 33 / spring 1993 page 18 has an article by R. E. Brune Torres’ guitar restoration his insights as to Torres construction, and photos are a must. Mr. Brune is a guitar maker and guitar historian. A membership in the Guild of American Luthiers 8222 south park avenue, Tacoma, WA. 98408 phone 206 472 7853 would be a good source of information and contact with other makers for you they publish quarterly and hold conventions every few years the emphasis of the publication is educational. Read la guitarira espanola–the Spanish guitar – by Museo Municipal, Madrid and the Metropolitan museum of art, New York. I hope this learning experience will be a pleasant one. You have undertaken a long process be patient with yourself. My methods are not the final word on classical guitar construction when you see a way to improve—do it. Neil Osberg
Thanks to Ross Kowalski, teacher, web author, artist, photographer who did the technical work implementing this site and technical advice to the author.
Chapter 0
Tool Sharpening.
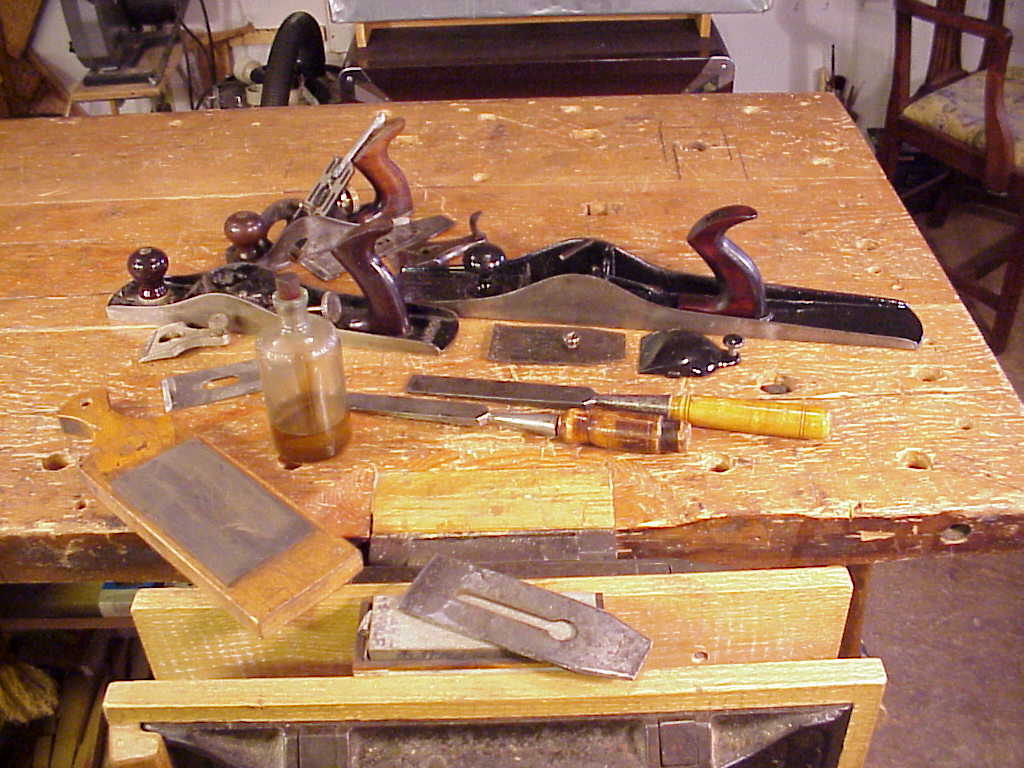
Sharpening plane irons and chisels is easily done with a few simple tools and a little effort and practice. If the tool edge is in good condition a whetting may be all that is needed, try to avoid unnecessary grinding. If the tool edge is in bad condition squaring of the edge and grinding must be done. When grinding always have a can of water close by and dip the edge being ground often – reason – burning of the steel when grinding will destroy the temper and cause the edge to fail. Follow the old edge angle as close as possible. Most wooden plane irons, Japanese planes of good quality, have irons made of two layers in the area of the cutting edge these irons so will feel different when grinding be cautious.

Whetting plane irons ground bevel, cover the whetstone with kerosene to prevent the stone from clogging with metal particles, rust etc. Hold the plane iron as in the image resting flat on the ground edge move the iron in the direction of the arrow for a few strokes. Look at the ground edge you will see the action of the whetstone on the surface. Now turn the iron over and whet the flat side.

Whetting the iron on the flat side removes any burrs from whetting the ground side. Keep the iron flat on the stone, check the stone to be sure that the surface is flat or try to find a flat spot on the stone. Repeat this ground bevel to flat until the edge is sharp. Next hold the iron as in the image of whetting the ground bevel, raise it a little higher and rub in the direction of the arrow, feel with your thumb for a slight burr on the flat side. Remove this burr by whetting the flat side. Do three raisings of the burr using medium pressure for the first burr, less pressure for the second burr,very light pressure for the last burr. For the first medium raising of the burr use three strokes, second two strokes,final one stroke. On the flat after each raising three strokes, two,one and done. Now you are ready to strop.
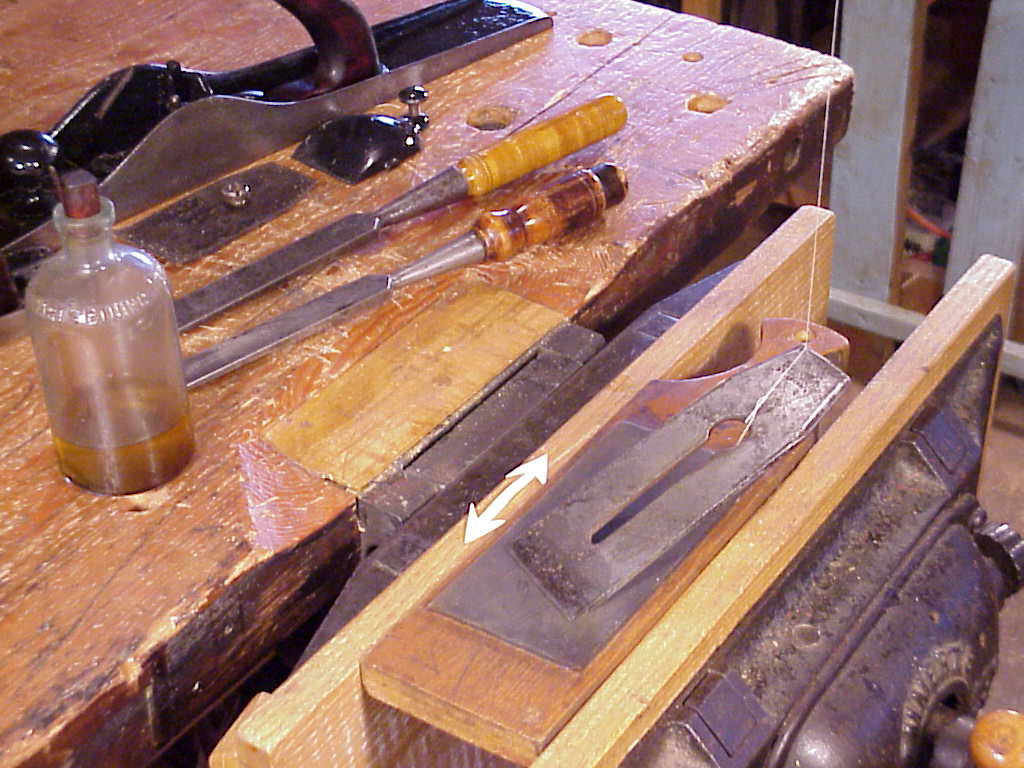
Stropping the edge will remove any burrs and give a razor edge. Get a piece of wood as in the image and glue a piece of thick leather on it skin side out. Put some light oil on the strop leather and you are ready to strop. Strop the edge going from ground edge to flat stropping away from the edge until you can shave the hair on your arm. Repeat the whetting and stropping until you have success.
Chapter 1
Wood Getting, Splitting, Sawing And Curing.
To be able to use wood in your local is convenient and economical, it can give you control of your wood supply, and is easier than you think. A piece of bass wood destined for your fireplace or stove can be glue blocks, liners, an end block or the white wood in your rosette. That piece of maple next to the basswood could be a three-piece guitar back, a bridge, fingerboard, pegs etc. Stain or dye to change color, or does the maple show curly grain and would make a violin neck, back, sides, bridge and pegs use your imagination and you will be in control. You will also free yourself of the worry of ruining a piece of wood you spent next months money for. If a disaster occurs grab another piece of wood and go forward. Those living in the cities where wood is scarce can resort to old furniture, building demolition sites, lumberyards etc. If you can get wood in the log, cut it in two foot lengths for guitar backs and thirty four inches for sides. Spit it in half and then in quarters which you then level with ax and plane. Then take it to a cabinet shop, school or friend to saw about three sixteenths inch thick for back and sides, as the wood is green, paint the ends with melted paraffin—CAUTION melt in a pan of water no fires please— paint about one half inch up. Stack the wood in a dry place with strips of wood in between to allow air circulation no direct sunlight. If in a hurry, hang over a stove or radiator to cure faster. As you saw from the quarter mark the pieces that lay next to each other it will make it easier to match grain and color. The old rule of thumb to dry one year one inch and another year in a control room at about 45% humidity and to assemble at 45%. When bending sides they are soaked but they dry in the heat of the bending iron. Favorite North American Woods- Number one is black cherry (Prunus Serotona) used for furniture and firewood it is beautiful and works well. It grows to be a large tree, on the quarter it makes stable neck wood, backs, sides, bridges, fingerboards, and pegs. Takes stain well. Use Analine stains, as oil stains will muddy the wood. A mixture of Lye and water will go light to chocolate depending on solution strength and time. Please practice on a scrap piece of wood before using it on an instrument. Maple-black Maple is very hard and occasionally has curl and birds eye. Holds up well for necks if cut on the corner, but is heavy. Good for back side’s etc. Walnut is a good guitar wood, but has an open grain and requires filling. White Oak cut on the quarter is attractive for backs and sides. Do not use for necks it is a free bending wood. White Oak can be fumed with ammonia; shades from golden to brown can be achieved. Do fuming outdoors in a cardboard box. Put ammonia in a saucer, close the box- DO NOT BREATHE FUMES- Peek in to check color-practice on scrap. Cherry called, Cerezo in Spanish, and is widely used in Central and South America for guitarrones, guitars, quartros, tiples, charangas, violins, harps etc. Cuban Cedar (Cedro de Cuba) a light strong aromatic wood easily carved is the traditional neck wood of Spanish luthiers and is my favorite neck wood. Top woods are softwoods-Spruce, Pine, Fir, Larch, Red Cedar. Cedar had become very popular. These woods in North America are to be found in lumberyards, building demolition sites, width and quarter grain must be looked for. Most lumberyard personnel do not know what quarter grain is. Eastern Red Spruce is great wood. Occasionally European woods can be found here. Norway Spruce (Picea Abies) was planted very early in the U.S. and is a good top wood. The Guild of American Luthiers publication has numerous advertisements for wood—Mail them at 8222 South Park Ave., Tacoma, Wa. 984081.

A large Black Maple was blown down by storm, it will be cut into eight foot lengths and skidded out of the hollow and to the clearing by Mat Harvey and his team of twenty year old Belgians. This logging operation will be accomplished without the use of fossil fuel with no damage to the environment, except for a little Methane release from the horses and humans present.
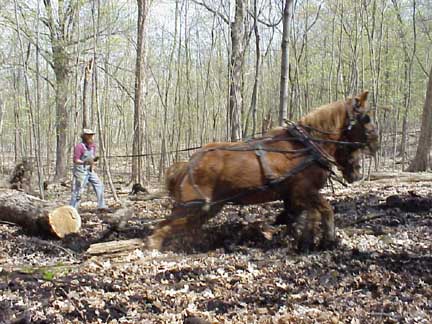
Mr. Harvey and team going through mud and rock to higher ground. As I watched the teamwork, it appeared to me that they were enjoying themselves.

Mr. Rosenheimer’s great grandfather brought the seedlings for these Norway Spruce, from Bavaria 145 years ago to plant in the cemetery he founded in Schliesingerville.

In 1997 as my step son (Mike Strzelecki jr.) and I were driving past Rosenheimers cemetery, my step son noticed that a dying tree by the gate was marked for cutting. I asked if the tree was to be cut and if I could have the wood. Mr. Rosenheimer said it was to be removed, and that I could have the wood for instruments. The young trees on the left were planted to replace the dead one. Will they also be used for instruments some day??

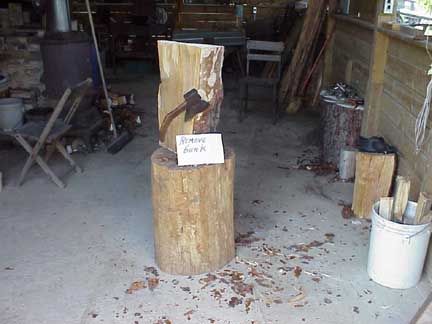
Paint the ends of the log to prevent split ends. Start the split with iron wedges and finish with large hardwood wedges. Split in half first, then quarters and so on
Remove bark using a Hewing ax sharpened to one side, if you are right handed hew with the bevel away from you. Getting the bark off right away get rid of bugs, it also stops the dulling of your saw by getting rid of rock and sand imbedded in the bark from skidding.

Hew a level surface and follow the grain as much as possible to maintain quarter grain, which is necessary for good top wood. Some runout is impossible to avoid, do you best and move on to planing level. Mount the wood securely as when planing by hand, great force is used. A plane with a curved iron is used to rough in — Criss crossing the surface, finish with a straight bladed plane. A large machine jointer will save much work.
Large hand saw can be used, but if you can find a Bandsaw it will save you much time. Saw guitar plates to three-sixteenths inch or thicker, seal ends with Parrifin and stack in dry place, put spacers between plates.
Chapter 2
Hide Glue Preperation and use.
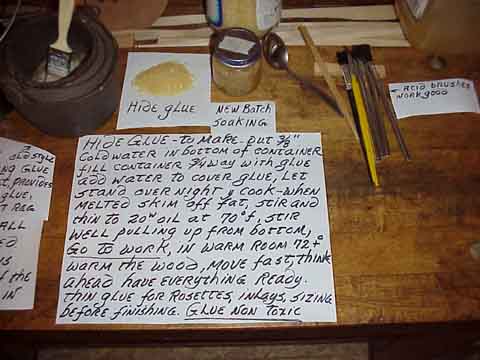
Hide glue is the traditional glue of the luthier. That four hundred year old instruments, are still in use is proof of its durability. Use it with confidence. Practice first on scraps, it has rules you must follow. A warm room to work in or warm the wood, Hide glue – to make-Put three-eighths inch water in bottom of container, fill container three-fourths with glue, add water to cover glue, let stand overnight and cook at 140 degrees, when melted skim off fat, stir and thin to equal 20 w oil at 70 degrees farenheight, stir well pulling from bottom, go to work in a warm room 72 degrees +, warm the wood, move fast, and think ahead have everything ready. You should thin the glue for rosetts , inlays, thin glue can be used for sizing, also before finishing.- Glue is non-toxic.
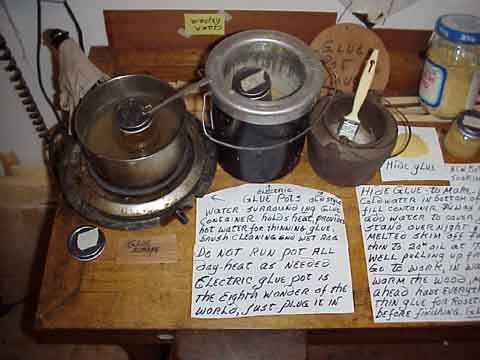
Glue pots, left a hot plate with a pan of water with baby food jar of glue. Use baby food jars as no need to mix a large quantity; I like to have two jars of glue ready when gluing a critical joint like the back or neck that in case of accident I am not out of glue. The water in the cooking pot holds heat and is handy for clean up. Do not heat the glue when not using it, excessive heating weakens it. On the right is a cast iron double boiler glue pot with a porcelain liner- Do not cook glue in iron- Sir Thomas Mace in his book Musiks Monument published 1676 states that glue be heated on a lead pot; the book has a lute repair section with good instructions for glue use and repair. The book has been reprinted in France by Editions Du Centre National De La Reserche Scientifique-13 Quai Antitole- France- Paris (Vlle)..I recommend it highly. In the center is an electric glue pot a great convenience – The eighth wonder of the world!!
Glue brushes-acid brushes for soldering work good and are cheap, if a wider brush is needed use a real hair brush, cut short, also thin wood spreaders are used, use scrap from guitar backs. A source of Hide glue in large quantities is Milligan and Higgins P.O. Box 506, Johnstown, New York, 12095-0506. I use 315 TG. Do your gluing at 45% humidity, if possible.
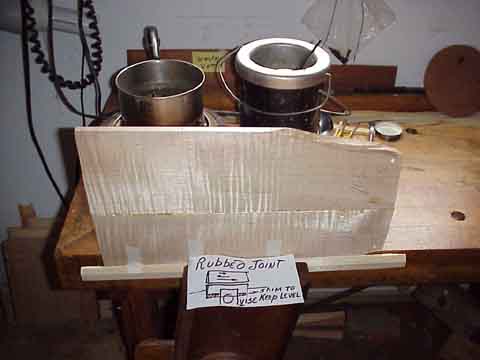
The rubbed joint, gluing without clamps, the joint must fit very close. On violin plates, make certain the joint surface is level, warm the wood, spread glue heavily, unite pieces and rub with a short motion keeping pieces in line, and bearing down until resistance is felt— Then walk away-The joint is done.
Chapter 3
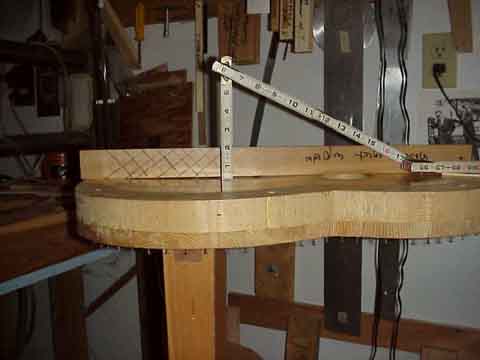
Leveling the solera
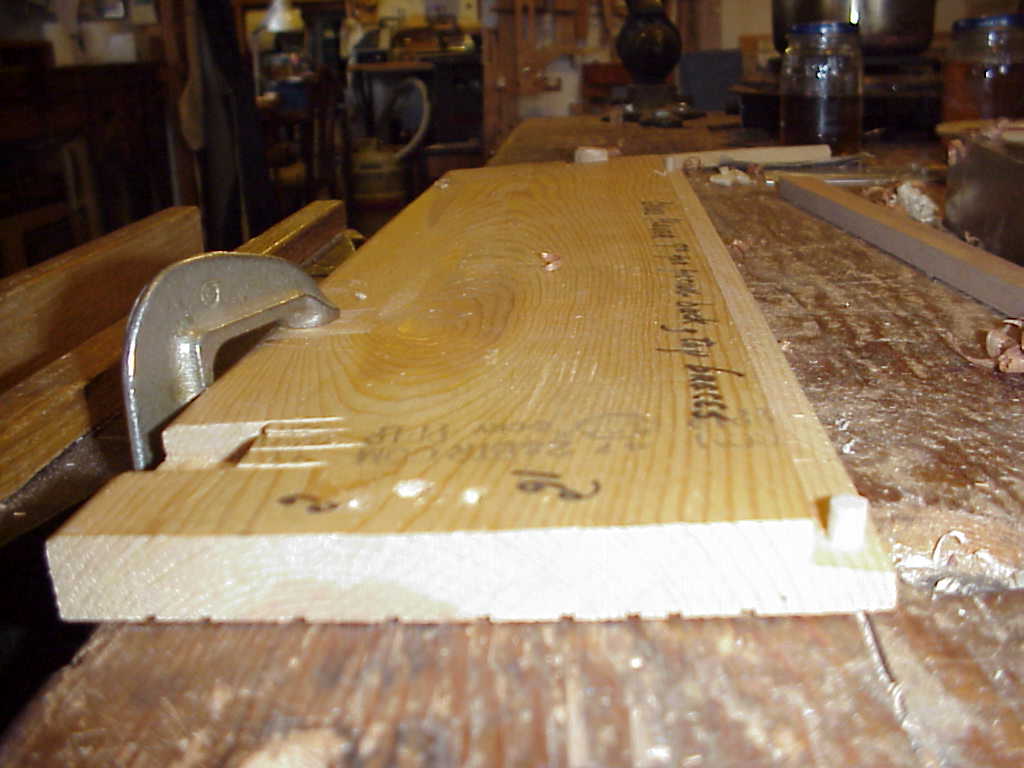
Glueing up the workboard/solera ,the workboard is the mother of your guitar.it determines the dome of the top,the neck angleand provides for the assembly of your guitar. Make the work board of 1″by 8″ no. 2 pine. Rip the pine into three pieces with a thin saw blade which will give you strips of pine about 2-1/2″ wide by ¾” these rippings will be used to make a laminated solera which is less apt to warp,remember to keep the knots all to one side giving you a relativly clear surface for the top of your solera.Make the lamination 4″ wider than the guitar and 6″ longer than the total length of the guitar. The extra width and length is to allow for mounting the mould and attaching to the shop wall or work bench. Glue up as in the image using Hide glue or Franklin tite bond glue. Remember to glue up on a flat surface and to put waxed paper or newspaper on the surface you are using to glue the solera. Use a heavy spread and clamp well. CAUTION PUT NO NAILS OR SCREWS IN TO THE SOLERA!! as it has to be surfaced and cut to dimension if you put screws or nails in you risk ruining a saw blade or other tools.
Leveling the solera,it is impossible to get the laminations perfectly level so you will be required to hand plane a level surface,use a straight edge for the long axis to insure that it is straight. Scrape glue squeeze out and level the surface. A 2″ square piece of hardwood 3′ long and jointed on one face and rubbed with lumber crayon and rubbed on the surface is useful in locating high spots. If you have access to a cabinet shop have them level the solera with their thickness planer or sander
Side and inner mould,take some pine and glue them up until you have a 3″ lamination. The boards are glued flat this lamination should be 4″ wider than the length and width of the guitar body. Saw it to the body shape of the guitar as in image,saw notches in the inner mould to allow clearance for clamps. Rasp the inner mould outside edge to give clearance for the side thickness and remove ¼” from the inside edges of the inner mould to allow for wedging. The outer moulds have to be joined with a removable joint on each end ,study the images of the solera,the reason for this is the sides will be fit when the outer moulds are unified,then the neck area will be opened to allow the neck to go through, and when the guitar body is together to separate them to remove the guitar. The outer moulds are bolted to the solera with ½” carriage bolts and wing nuts see images. The inner moulds are usefull for fitting and cutting the sides to length while in the mould,as a pattern when bending sides etc. Put some shellac and a coat of paste wax to protect moulds and to stop glue from adhering.

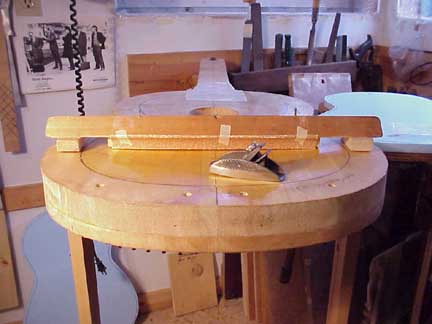
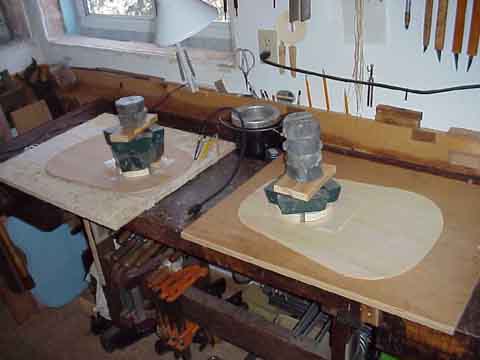
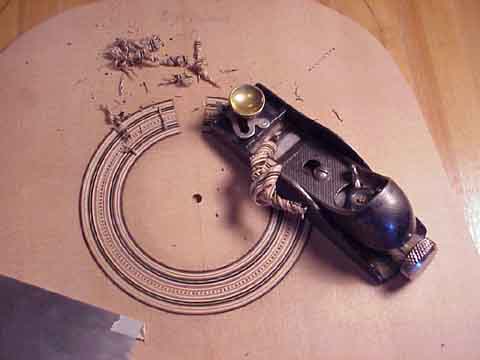
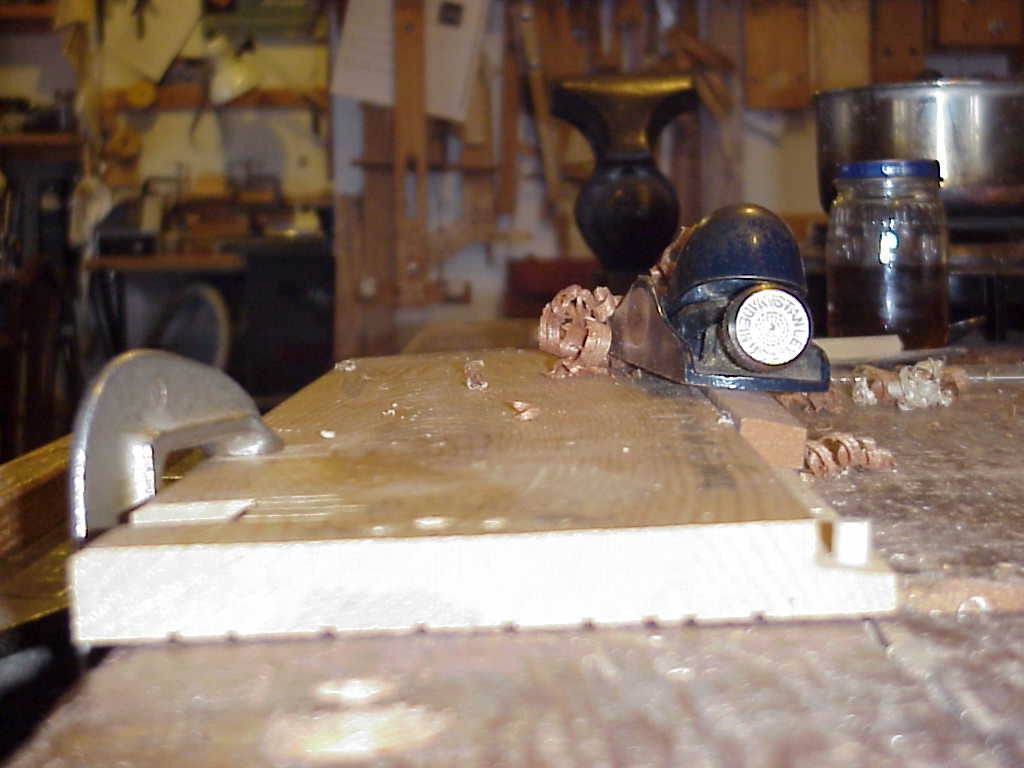
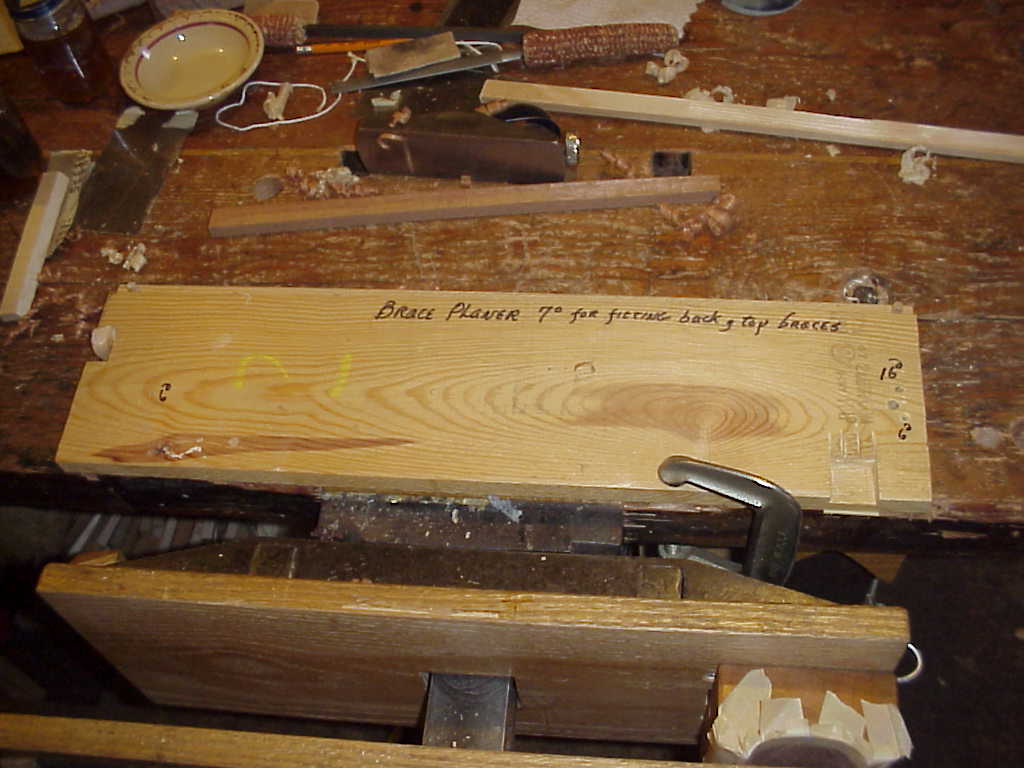
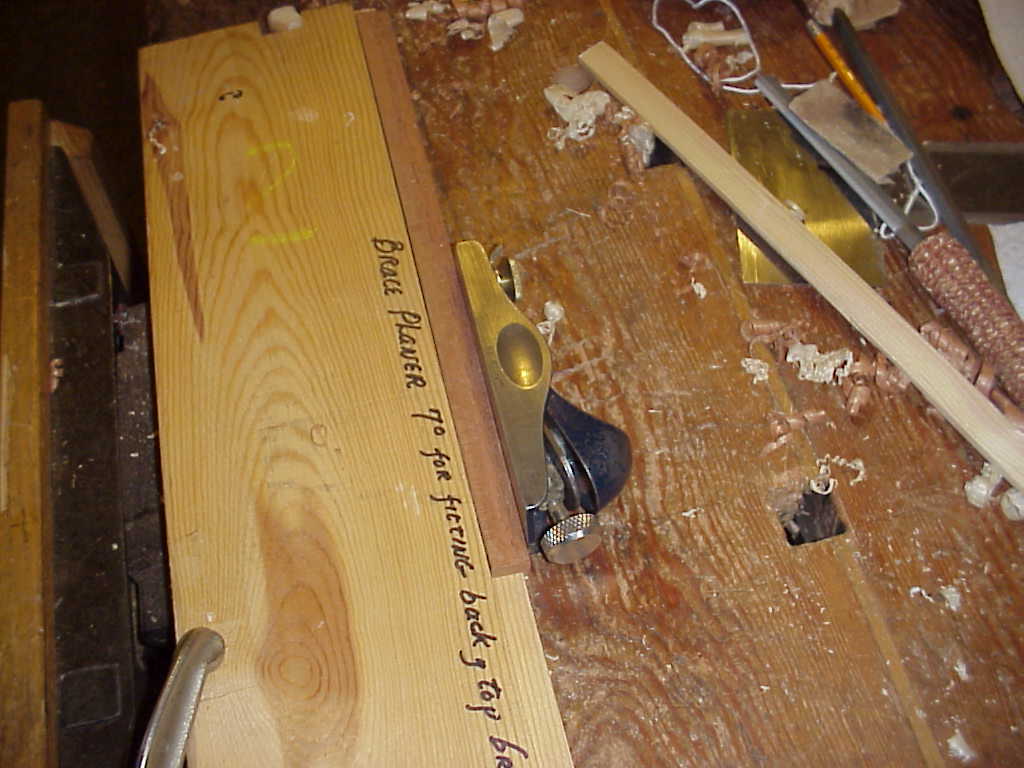
Parabolic dish to do-Now that the solera is leveled, the dish that creates the doming of the guitar must be created. In the image is a small cast iron plane that has been modified to make a hollowing plane simply grind a curve on the long axis and width a belt grinder or grindstone will do the job. Grind the blade to fit the planes sole take care not to burn the blade go slow cool quickly in water.This plane is usefull for shapeing braces .The depth at the center of the dish will be 3/16″ and the center of the dish will be at the center of the bridge saddle. At the inter section of the bridge saddle, to be determined by the fret scale) and the centerline of the guitar body drive a 4 penny nail 1/2 or more inches deep marking the location for the next steps. Take the small curved plane you have just modified and plane carefully towards the center mark from all directions takeing fine cuts leaving the outline of the guitar line showing. Do not go to the full depth with the plane the next tool in the image will do this. This tool will be rotated to finish the dish. To make this tool take a piece of wood 1-1/2″ by 1-1/2″square and as long as the one in the image.Mark the center and drill a hole the diameter of an 8 penny nail,turn the tool so that the hole you have just drilled is parallel to the top of your workbench,measure in 2″ from each end and drive a nail three sixteenths from the edge then at the middle drive another nail at the edge or corner on an angle, bend this nail up as are the first two that you drove. Now you have three points established take a flexible metal straight edge and placeing it on the outside of the center nail and on the inside of the two outer nails and you will have the curve ,mark with pencil and plane to shape. Put some limit blocks on the outer edges to control depth plane the limit blocks if needed to go deeper. The brace nearest the soundhole on the bridge side of the solera will limit the circumference of the dish. To make the dish wrap the tool with 60 weight sand paper slitting the edges to allow the sandpaper to bend unifornly,put an 8 penny nail in the hole in the radius tool and drive the nail in the hole in the solera made by the 4 penny nail,and rotate the tool to make the dish going to finer sand paper to finish.Now blend the dish to the contours of the guitar with scraper and sandpaper.The brace above should be 1/8″ dished at the middle going to zero at the neck top join. Make smooth gracefull curves. Sand lightly and draw the layout of all braces on the solera,cut out the area of the sound hole and on the oppisite side of the sound hole area make the solera thinner to allow small clamps to be used to clamp the top through the soundhole of the solera. Shellac or french polish the solera and apply coats of paste wax to protect and stop glue from adhering.


End view of solera showing dish area contours. The nails on the bottom of the solera are for glueing the back with twine.
Side view of dish in solera
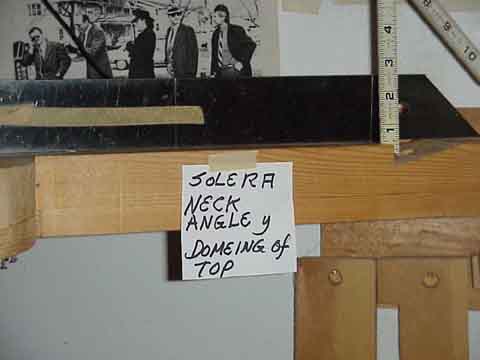
Neck angle,the neck area of the solera is planed from the neck body joint which is zero to the point of the nut being 3/64″ lower this determines the angle of the neck. As the guitar is built upside down when the guitar is removed from the solera the nut area of the neck will be 3/64″ above the plane of the top. Plane this straight and true takeing fine cuts be carefull, you have a lot of time and effort invested. A general rule the higher the dome of the top the less neck set.
Chapter 4
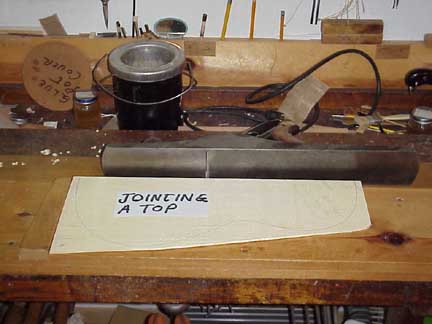
Jointing a top.

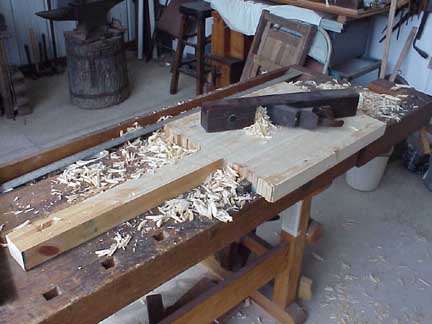
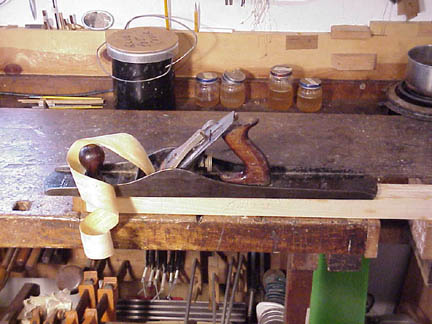
Make yourself a shutting/shooting board as in the image use the jointer plane for scale. Make certain your plane is sharp. Put the wood against the stop and let it hang over about one quarter inch , the plane should be set for a fine cut. Try a pass, if the wood tears reverse the board. Both boards must fit when held to the light and both edges must be square.
The sole of your plane must be flat, if warped find a flat slab of concrete take the plane iron out put water on the concrete and rub the sole of the plane on the concrete until straight, checking with a carpenters square, make certain the square is straight many newer ones are not, use plenty of water, polish the sole with 400 wet or dry paper and water, dry, rub paraffin wax on the sole. Use paraffin on the sole of wood planes after jointing them most old ones will need jointing. Keep your tools in good order and they will reward you. Do not grind plane irons every time they are sharpened, hone and strop them. Good planes, chisels, whetstones and other tools can be found at flea markets, rummage sales and at auctions at reasonable prices. Spend a little time to clean them up with 400 wet or dry paper and water tune the tool up and it will give you a lifetime of service. When buying make certain that the blade has not been ground too short from years of use , a new sole of hardwood can be glued to wooden planes to renew them. Look for a thick blade as they work better.
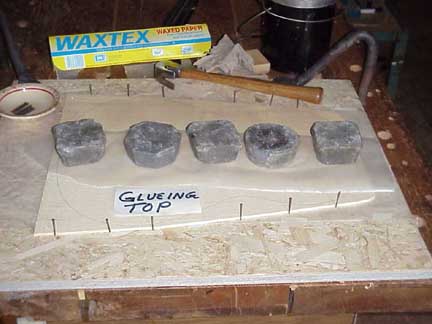
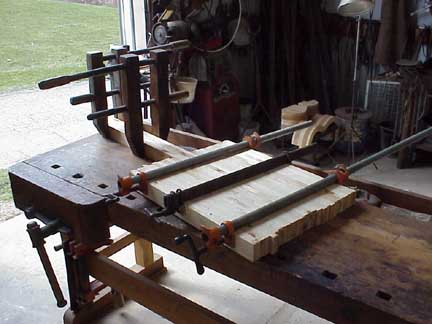
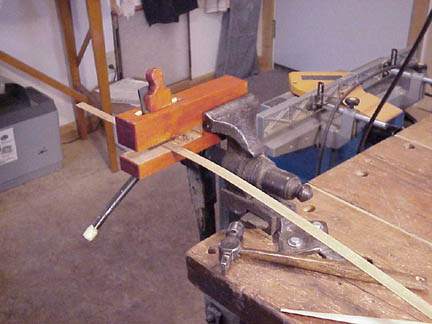
I will show you two of the many ways to glue top and back plates. In this image a piece of particle board or plywood is used as a base to nail to, tape waxed paper on the board in the area of the glue joint. Lay the pieces to be glued in front of you , on the board set four penny finish nails along the edge nearest you, leave three eight’s inch gap between the pieces, spread glue heavily between the pieces, pull the joint tight, put nails along the far edge, put wax paper and weight on the joint, bend nails inward to clamp joint and it is done.

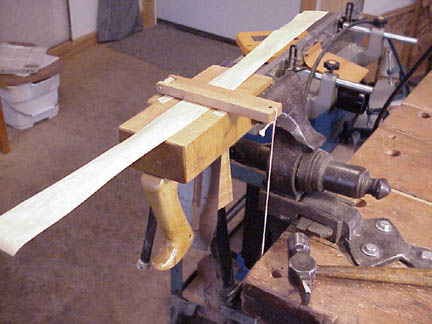
Using twine and wedges, the center board under the joint is waxed and has waxed paper also. Mount the jointing fixture in a leg vise. Again leave a gap for glue, pull the joint together, wrap with twine pulling as you go caution wax all your twine used for glueing with paraffin or it will be glued to the work, slip waxed wedges under the twine as in image. Separate the wedges and work with waxed paper.

Their soles have been trued and waxed, to your left is a toothed plane next a curved and last a straight.
It is set fine and used for rough removal.

Can be set for a coarse cut it will reduce figured maple and very hard woods like rosewood and ebony, when you think you are close to finish thickness, finish to dimension with a fine set straight plane with rounded corners. A slight rounding of the corners of the plane iron stops digging in and spoiling your work. Finish off with a cabinet scraper. To make a toothing plane anneal the plane iron and file teeth and reharden or grind them in with a Dremel Moto tool.
An old raze plane well sharpened and set very fine. When you can see through the shaving, your iron is set correctly. Keep the sole waxed it works better.

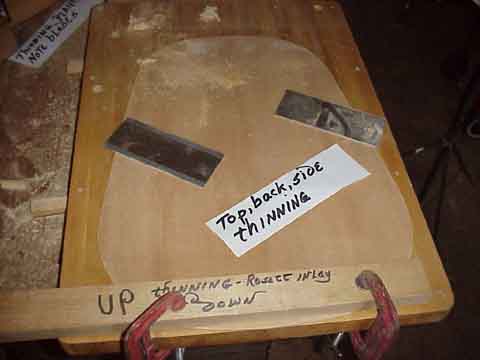
A straight piece of hardwood with blue lumber crayon or chalk rubbed on it, is rubbed over the wood you are thinning to see the high spots, when planeing and scraping.

Round ended hardwood pins that ride over the wood of the top, it is calibrated, put marks in with a sharp knife.

The gauge is a useful tool but you can do a good job measuring with a ruler around the edges and using the rubbing board and your fingers. When using the rubbing board the top or back to be thinned must be placed on a level surface. The side pieces, on the gauge are scrap rosewood glued on to give stiff’ness.
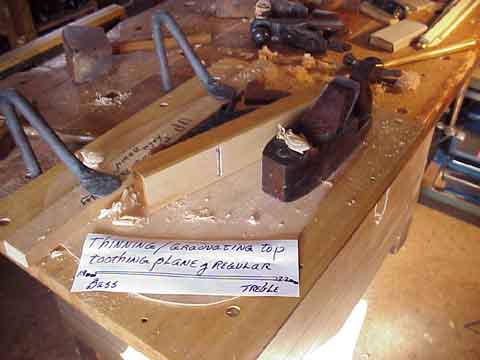
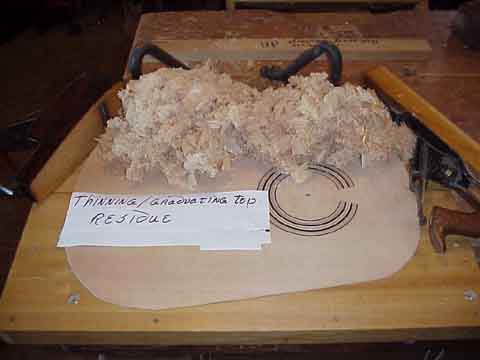
Diagram shows a method of graduating for sound. The thickness, and sound you wish to achieve will ultimately ,through experience be found only by you. Personal observations , of many classical guitars has given me a thickness range for tops of 2.5 to 1.8 mm. I personally favor thinner at the bass side and thicker at the treble, in hope of booming basses and brilliant full trebles. The thickness or thinness I try to achieve is 1.9mm at the bass side and 2.2mm at the treble in the region of the widest part of the lower bout. Later when the fan braces are installed they to can be graduated to give the desired flex in different regions. The knowledge of springing the top can only come through experience as each piece of wood is different. The ideal classical guitar should be responsive in all areas, easy to play, with the ability to color the sound in all regions and with good volume. It should be responsive the first time it is played. The great composers of the past could not have heard their works played, if the musicians had to wait a hundred years for the instruments to function properly.

Mark grain direction to avoid tear outs.
.- A valuable tool with many uses, used in thinning , leveling, finishing, removing finish etc. I would be lost without them. They require sharpening to a square edge and then a burr is turned with a burnisher ,the burr is the cutting edge.
Note thinness, I seldom sand the interior of the top leaving the planed surface-top back and sides showing the work of the toothing plane, smoothing plane and scraper.
Chapter 5
Constructing the neck
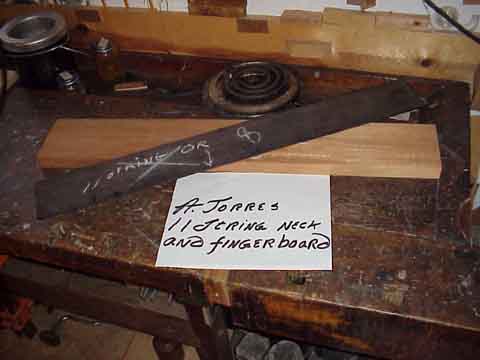
A fingerboard and neck blank. The material for this neck blank is cuban cedar or cedrella, neck wood should be cut on the quarter and well cured. Old furniture is a good source of cured wood. Some neck woods are honduran and phillipine mahogany, ceresa or wild Cherry. Ship builders are a source of wood, as well as the wood suppliers listed in the guild of american luthiers publication. The stock thickness is 1 Inch and long enough to provide for peg head and the heel.
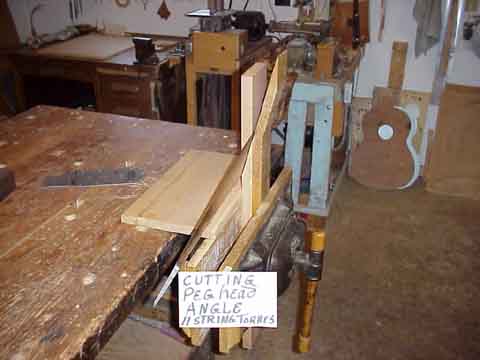
The angle for the peg head joint is easily cut by hand, make yourself a sawing guide as shown in the image. The cutting giude has the same angle as the finished peg head and is also cut by hand. A piece of hard wood log split and sawn works well for the sawing guide make the grain on the quarter for stability.
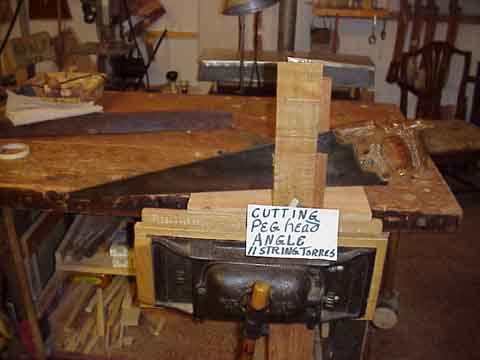
Another view of cutting guide in use to make peg head angle. The saw rests against the guide one hand on the saw blade and the other on the handle for control. practice first on scrap wood.

A view of tools, neck blank cut and a finished neck. The joint surfaces must be planed to a perfect fit. That the joint fits is important.
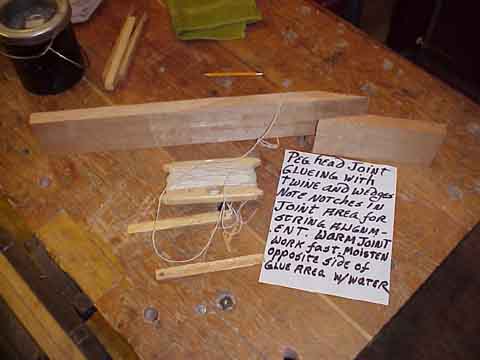
Prepared neck and materials needed to glue neck Joint. The twine used for tying/wrapping the neck joint must be rubbed with paraffin to avoid sticking. Six inch wedges will also have to be waxed . These wedges will be forced under the twine to tighten the glue joint. Small notches on opposing sides of the joint are made. Their purpose is stop slipping of the joint while gluing -the twine when gluing is first put in these notches pulling hard on the twine going round and round until done. The sharp tipped wedges are then pushed in while taking care to keep sides of joint etc, aligned. Important. The joint must be warmed, the opposing side of the glue joint must be moistened, the glue spread heavily to avoid starved joint, pull twine tight, use fresh glue of proper consistency, work fast, practice on scrap. If a bad joint is made pull or saw apart re-plane joint and reglue. Take pieces to be glued longer in case of Error.
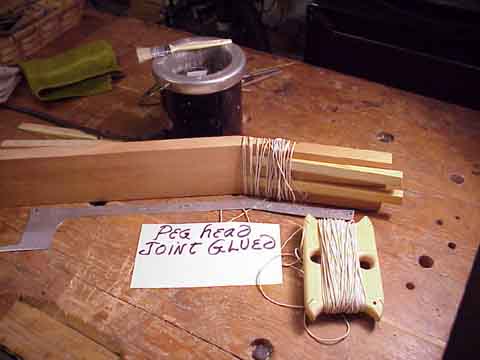
Peg head joint done. Next take some pieces of the same wood as the rest on the neck, the same width as the neck and cut lengths as in the images to make the heel and foot of the neck.

The heel assembly can be glued with clamps but I find it easier to use the iron bench hold downs. A word about the bench and hold downs. The bench top is about three inches thick of pine most bench tops are of hardwood but softwood has its merits it can be nailed into for Holding awkward pieces also notice the many holes for holddowns, bolting fixtures, swing lamps etc, have a blacksmith make the iron holddowns (it is not necessary to use steel) of three quarters round stock as in images with a foot to grip the stock the foot is made by upsetting the iron and flattening. Make it plenty long. Drill a seven eighths hole in the bench top For the holddown. If the holddown slips put chalk on it. Make at least two holddowns. Plane the pieces to fit for the heel assembly mark the areas to be glued so as to have full coverage. And that the assembly sequence is maintained and positioning is correct. Warm the wood ,use heavy glue spread on both faces, put pieces together wiggle and push joints together ,as in rubbed joint. Work fast and glue up the other pieces in like manner and then drive hold downs on assembly using a wooden mallet. You are Done. Put wax paper under the assembly. Also put heavy coat of paste wax on the bench top (Lundmarks paste wax is very good for bench tops and guitars it has no additives)

Plane level neck and peg head face. Square up sides.

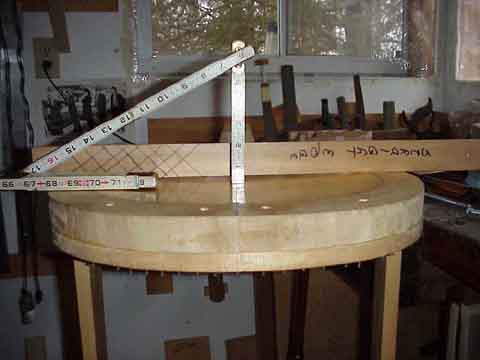
The length of the neck is determined by the scale length which is the distance between the nut and saddle. A classical guitar has 12 frets to the body join. Always be governed By the scale when laying out the neck length. Get some sheet aluminum From the hardware store and make templates as the image shows. When the neck layout is complete square down the sides and make centerlines down the entire length of the neck (both sides). The slots for the sides will be cut to the guitar side of the twelfth fret. The side slots will have a slight curve To conform to the guitar shape. The long dark object is a straight edge the type that linoleum floor layers use. On it is scratched the scale mark the Twelfth fret to avoid error. The straight edge is an important tool and is Used to check neck straightness, in drawing plans, to draw the center line of the neck and peg head it is flexible, top layout etc.
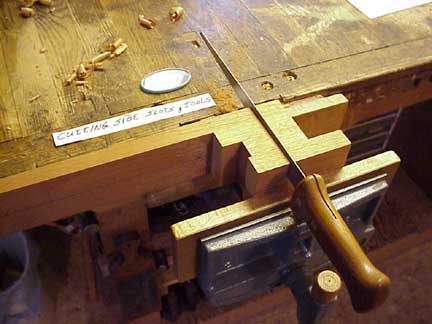
The neck layout is complete and you are ready to cut the neck slots. The slot is cut next to the twelfth fret at the body side of the neck. Cut with care use a small mirror to see the other side of the cut. Caution when clamping the heel assembly clamp in center of vise make certain heel fits. Shim if necessary if heel or vise jaws do not fit.
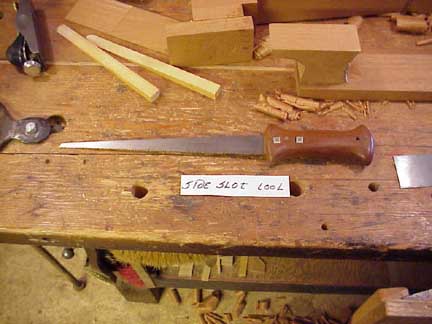
The side slot cutting tool. Nothing more than a thick keyhole saw blade, try to find one about three thirty seconds of an inch thick. If too narrow set the teeth a little more. Take a piece of scrap wood and put handles on it. The sides are fitted without forcing, they are not glued in. A small wedge or spot of glue in the inside of the guitar to stop any buzzing is all that is needed.
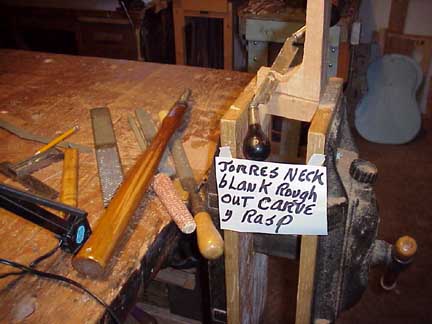
Torres neck roughout.
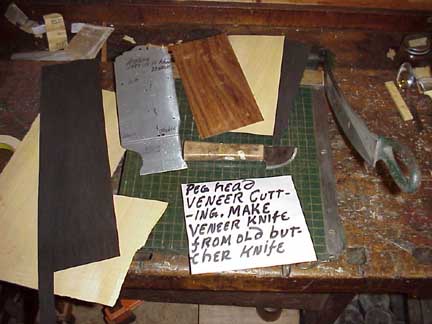
Peghead faceing a decorative peg head overlay that also helps strengthen the peg head. Traditionally a scrap from a guitar back with black and white veneers underneath. A veneer cutting tool can be made from an old butcher knife carbon steel is preferred cut teeth in it and sharpen like a knife, a paper cutter is great for cutting Veneer.
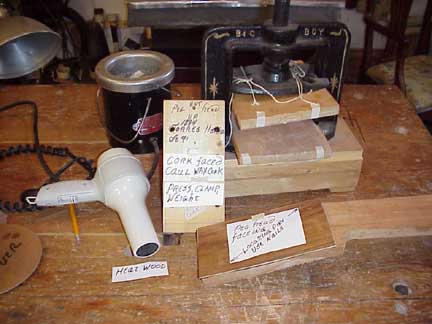
Cut the peghead overlay oversize. Locate the overlay with small brads into the peg head. Locate the brads in the machine head slots or where a peg will go. Cut off the head of the brad and slide overlay off. Drill holes slightly larger for ease in gluing. Make a piece of wood with a cork face and clearance for the brads for clamping the peg head overlay. Wax the cork and put wax paper between the overlay and the cork. Warm the woods, a hair dryer works well, spread glue, for components one joint at a time, when the overlay is glued, put wax paper, cork faced wood cork to overlay and clamp or press. Move rapidly have and have everything ready.
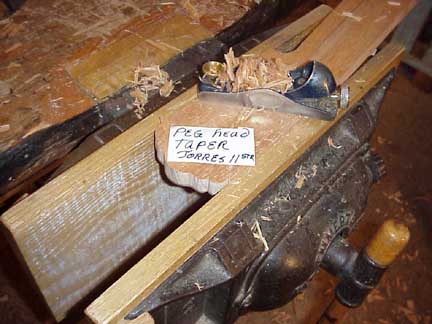
Tapering peg head. Many traditional spanish guitars had a tapered peg head it adds to the appearance and lightens the peghead.
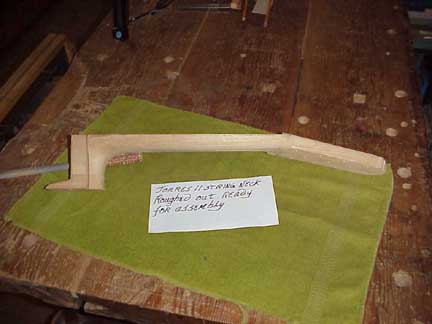
The neck ready.
Chapter 6
Bending the sides
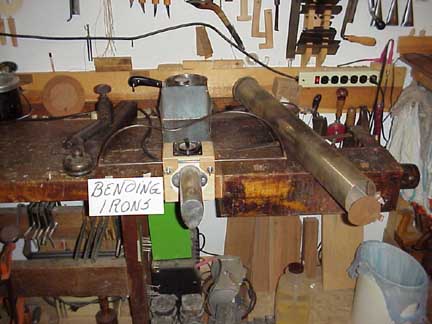
Bending irons to the left is an antique violin makers iron heated by a spirit lamp. In the middle is a modern electric iron and at the right is an iron made of three inch diameter pipe squeezed in the vise to an oval eight inches back from the end faceing you with a movable end cap for heat control. The pipe has a hole cut at the dark area in the image for heat from a gas burner to enter, at each side of the hole are fixed iron bars for clamping to the stove. The end of the pipe is capped. Pipe is also used to make vertical bending irons they are about a foot tall,capped on the bottom with legs. They are heated with charcoal,cotton or rags soaked in alcohol or kerosene provide heat. The electric iron is safer and emits no fumes.
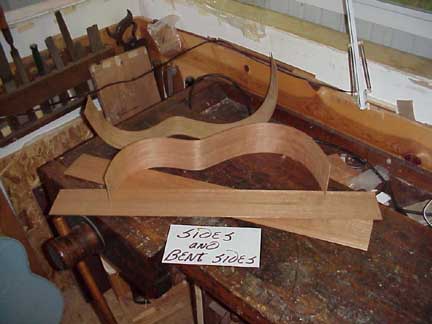
An image of unbent and bent sides. You will find that it is not difficult to bend sides once the sides are thinned to the proper thickness which varies from 2.5mm to 2mm and you have marked the location of the waist. Put them in water for 15 minutes and you are ready to bend. Practise on scrap wood first.
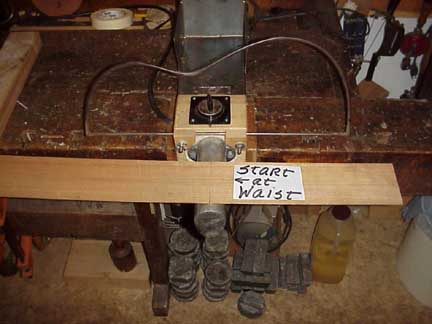
Start at the waist. Heat your bending iron to a temprature that will brown a piece of white paper placed upon it. You will place the waist mark at the center of the iron and push with both hands use a rocking motion to help keep the bends smooth. Do not put your hands too far apart as this gives to much leverage and you may break the sides. When the waist fits the pattern turn over the side start at the upper bout and bend to shape . Wet the wood with a rag or sponge as you bend it will make it easier. Do not be concerned if you over bend simply bend it back. Bend as close to your pattern as possible. It is not necessary to put the sides in a form as when you are ready to assemble the guitar you will bend again to correct any distortion wetting with a rag or sponge.
Chapter 7
Make and install rosette
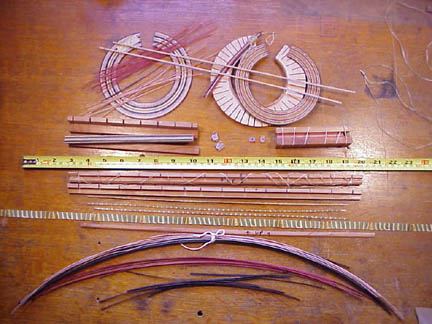
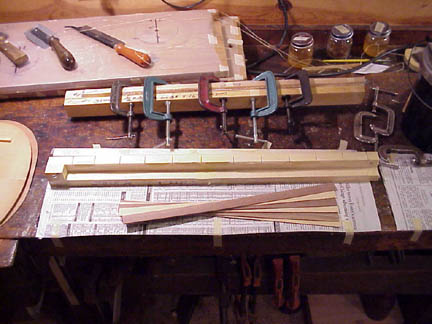
Rosette fixtures and materials, at the top of the image are finished rosetts and various sawn strips used in the fabrication of the rosette. Above the ruler are glued up tile logs and glueing fixtures. The small squares in the middle are tiles cut from the log. Beneath the ruler are, top to bottom, herringbone glueing fixtures and completed herring bone and multicolored strips which make up the completed herringbone. Next are strips which form the other parts of the rosette. When glueing up laminated pieces that are to be bent, add 10% glycerin to the hide glue to make the glue more flexible ,as hide glue drys very hard.
Make thin rosette materials with a jointer plane and wetting the wood. The 0.03 mm strips in the Torres herring bone can be made using a hand plane. Use a very sharp jointer plane,first wetting the wood and letting the water soak in for a little while. Then with the plane iron set for a deep cut plane thin wood as in image. Great force is required.Basswood/linden or similar woods work good for planeing thin materials.
Wood can be thinned by pulling over a plane iron to very thin dimensions. The tool in the image has a block plane suspended on the string to apply pressure to the strip to be thinned. Note the strips on each side of the middle wide strip, these are gauges the thickness of the finished materials desired.
In Dennis Diderots Le Luthier circa 1750, plate 8 vol 5, fig 38 is pictured a fillerie a filets or strip thinning tool. This tool works good and if you choose to make one have a black smith forge a thick blade so you will have less chatter. The thin modern plane irons tend to chatter.If your wood is very dry and brittle moisten it and it will not break as easily when pulling. Set the iron on a slight angle to allow the strip to feed into the blade.To prepare the wood to be thinned saw rough strips with a handsaw, table saw or band saw,planeing the next piece smooth before sawing.Put the planed side down in the strip thinning tool set the iron or put the weight on the gravity type and pull the strips to dimension.

Cutting tiles can be done with a small homemade miter box or easily cut with a slide fixture made for a scrollsaw or band saw as in image. A word about saw tables,purchase only saws with square or rectangular tables which will allow you to make various types of sliding fixtures.

Strips can be cut with a veener knife and guide,table saw or a fixture can be made for your band saw etc.

Squares can be cut from thin woods for the logs for rosette tiles. With care the pattern can be laid takeing the layers and dipping the ends in glue and setting one on top of the other. If you are going to make a lot of one pattern then take 2cm wide by 10cm long, strips of colored veneer and glue them until you have one layer of the pattern you desire,continue making the rest of the layers. Then saw them and assemble the multicolored strip assemblys into the tile log. The log is then cut as one would cut a sausage to make the tiles.

An eraser mounted on a stick is usefull and safe for sawing small wood.
Glue up dental mold.,add 10% glycerin to glue for ease of bending, stir well.

Tile making the tile strips can be cut individually and assembled for a design, but assembly is difficult. A much easier way is to cut strips as in the image and assemble. In the image are black and white strips which will be used to create a simple checkerboard design. This design was used by Torres and is a good starting design for demonstrating the process. The woods used for the checker board tile are ebony for the black. I used trimmings from fingerboards, the black in the herring bone is also ebony. The white wood is Basswood or Linden. Cut the woods with a fine toothed saw blade on a circular saw, band saw or scroll saw to the thickness of the squares in the pattern. You will decide the thickness as you are designing the rosette and are not governed by standard veneer dimensions. Even when using standard veneers it is desirable to change dimensions by pulling the veneers through a strip thinning tool to a different thickness, to break the monotony of standard dimensions and to achieve a unique visual effect. Note in the image that there is a black on top and white on the bottom this is for reversing the pattern to give the checkerboard effect. These strips should be glued in a stack in a fixture that looks like the fixtures in the image and bound with string. Use regular hide glue without the glycerin as these tiles are not required to flex. The glue will be dry in about an hour and a half and you can saw the stack the same thickness as the tile squares. You now have multicolored strips that are to be stacked, reversing each layer to give from the end of the log the appearance of a checkerboard. Glue them up and when dry cut your tiles using the methods described elsewhere in this site. When cutting tiles hold a paint brush over the tile to prevent the tile from flying and becoming lost also use your push sticks with eraser ends to grip the log when it becomes short.This is the principle that you can use to make infinite varieties of tiles the only limit being your imagination. To make different patterns you can layout the design layers and use colored pencil.To make a flower draw the flower divide it into squares, graph paper is handy for this and create your layers in wood. Inlay making is time consuming be patient keep trying and you will master the process. You will be able to say that you made the complete instrument as did Torres and other great makers. On a number of occasions I have been asked where did I buy the pretty decal around the sound hole, which is a bit discouraging but then I realized that many individuals have never seen marquetry and you like I,will have fun explaining the process.

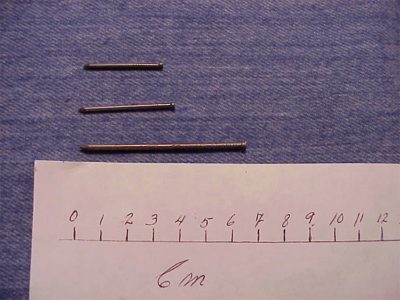
Assembly of the rosette is enjoyable because after all the planning and construction of the various parts, that which you conceived is becoming a reality. Wax heavily a piece of softwood which will be your assembly board cedar or soft pine is good and put plastic sheet or waxed paper on it. Next make your rosette interior dimension disk of 2.5mm plexiglass or wood heavily waxed wood, make it larger than the size of your 85mm sound hole the margin is that which pleases you. Put a wood screw in the middle for mounting to the work board. Get some pins as in the image these are for holding the various elements of the rosette during assembly. Try to get the pins with the large top as they will be easier on your thumb. Heat up your glue and thin it so it runs easily off the end of your brush. Have a hot plate with hot water and an extra jar of glue heated. In case you should run out of glue or spill your glue pot, and a rag wet with water for cleaning as you proceed. In the image on the right are strips, herringbone and tiles in proper order. Set up the order for your rosette on a bench away from where you are working. Go to the rosette pieces and take three of the starting strips and having everything ready dip the ends in glue and start at the lower left or right, whatever is easiest for you. Proceed glueing and pinning in about an hour start another layer. When glueing herring bone or other laminates to be bent use plenty of glue as the glue will soften the design and avoid damage. When bending herringbone put two strips on the outside this will also avoid damage. Tiles will have to be set close by, a piece of wood with groves for the loose tiles works well. Place the tiles with two outer strips and go around. Keep cleaning the excess glue as glue build up will be in the way of the next layer. Proceed in this manner until done.
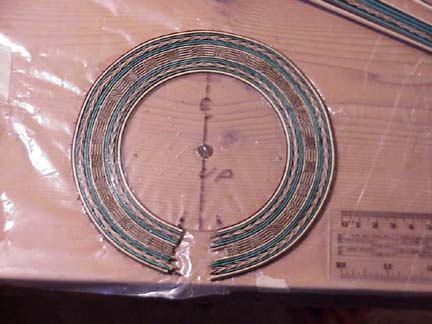
Finished rosette can be scraped and leveled while on the rosette disk. Take care not to use too much force in scrapeing as you may loosen tile pieces. Remove from disk and level back of rosette take some glue and work it into the rosette. This rosette contains 2,164 pieces.

Inlaying the rosette into the top is done by first locating the sound hole center as in the plan take your 85mm sound hole template and draw around it. Trim the rosette ends and make certain the edges are smooth. Now lay your rosette in position and go around it with a sharp knife or draw around with a sharp pencil. With a sharp knife score the rosette margins 2mm or less deep with a chisel or router remove carefully the area to receive the sound hole. When the rosette fits without forceing you are ready to glue it in.
Glueing the rosette using regular strength glue and lead weights is easy. Notice the semicircular wood pieces that the weights are resting on make some slightly less in width and length than the rosette and wax them. Put some waxed paper on a flat surface, put the top in position, have everything ready. Put glue in the cavity and on the rosette (CAUTION MARK THE TOP OF THE ROSETTE TO AVOID REVERSING) put glue on the rosette, install rosette, place waxed paper on rosette, place wood strips, add weights and you are done.
Leveling the rosette with a low angle plane and scraper takes care. First coat the rosette with glue to fill and make certain the rosette elements are secure and to fill cavities let the glue dry. In the image is a Stanley no. 60-1/2 block plane it is a good plane to have in the shop, It is usefull for many things.
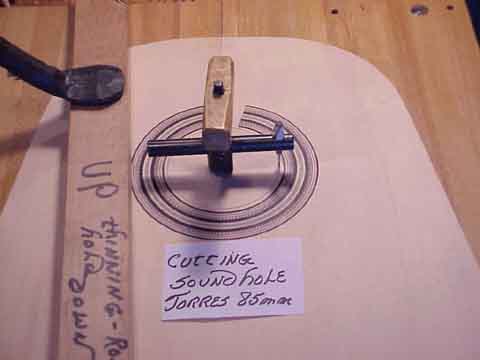
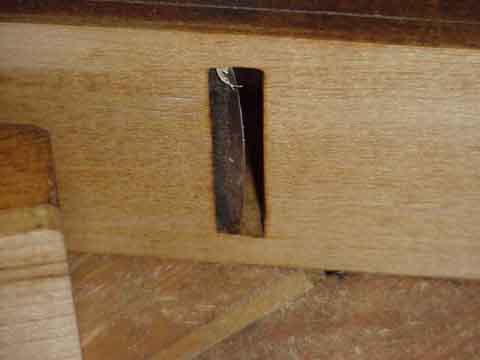
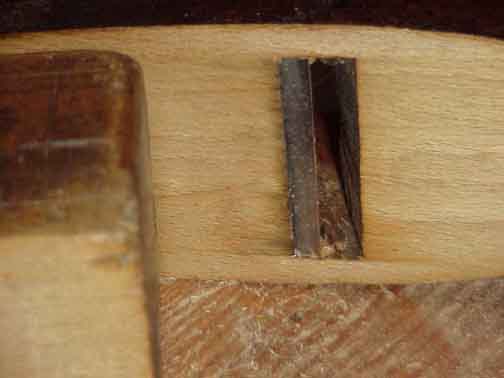
Cutting the sound hole with a circle cutter is easy make your self one or modify one. The blade on the ones commonly sold must be ground as in the image to work well, set the blade to cut a 85mm hole. Make a laminated workboard with a ¼ inch hole to receive the shaft of the circle cutter. This board is also usefull for thinning and other things. Cut the sound hole one half way only. Finish the surface of the hole after the finger board is on.
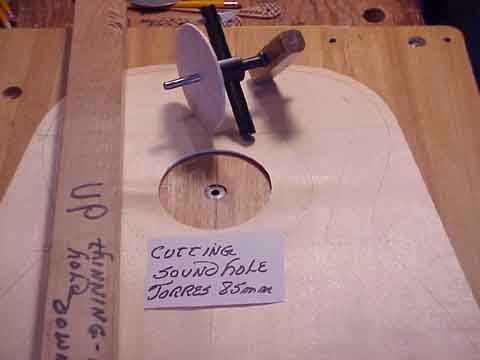
Cutting the sound holes other half from the back side will eliminate tear outs in the wood.
-Braces and Fan Braces

Using the template you have made from the instructions contained in Torres full sized plans, mark the locations of the braces. Wood grain direction and brace contours are shown in plan section 21. Fan brace grain is vertical to the plane of the top. Main braces are at an angle as seen in many old Spanish guitars. Use dry spruce, pine or fir for brace material. A good source of aged brace material is old wall studs from building demolition or remodeling sites. Trimmings from the top, before thinning is good for fan braces. Splitting the wood provides better braces. Using different wood species for braces will not harm the sound and may give you the ability to alter sound slightly using harder or softer woods.
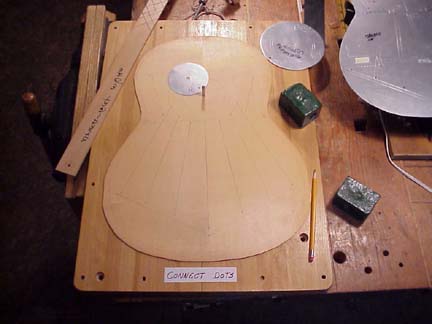
Connect dots by drawing lines as in the image
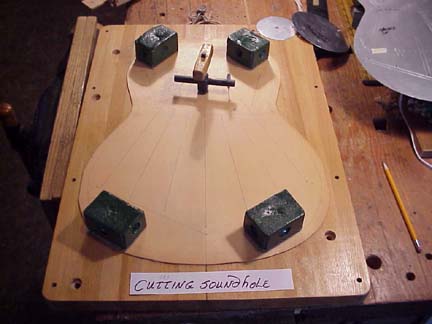
Cutting the sound hole is done before glueing the braces. Cut the hole slightly more than half way from each side to give a clean cut and prevent damage to the workboard. Finish the sound hole edge radius after the banding and fingerboard are done.

Using twine and wedges, the center board under the joint is waxed and has waxed paper also. Mount the jointing fixture in a leg vise. Again leave a gap for glue, pull the joint together, wrap with twine pulling as you go caution wax all your twine used for glueing with paraffin or it will be glued to the work, slip waxed wedges under the twine as in image. Separate the wedges and work with waxed paper.
Images of a small shooting board used for planeing braces. A low angle block plane works well. If the brace does not plane good, plane in a different direction. The brace shooting board has wood pegs at each end that act as stops for the brace. Put a thin strip of wood when at the small end of the tapered brace when edge planeing to maintain a perpindicular brace when glued to top or back. Braces do not have to very accurate but must not be too large or too small.

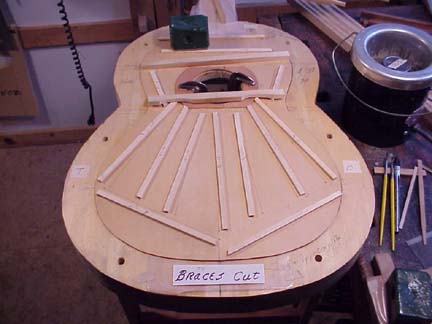
Braces cut ready to glue. IMPORTANT– all glueing is done on the dished solera, rosette side down to create the domeing of the top.
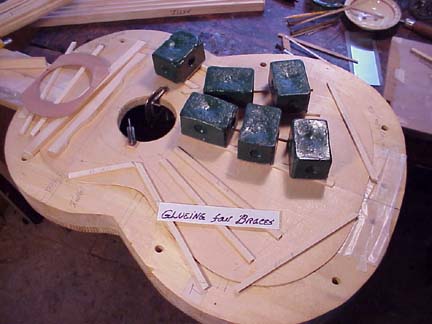
Glueing fan braces, starting with the fan braces spread glue on both surfaces place weights on fans. Glue two braces at a time as in image support weight on single braces with a trimming from a brace. Lead weights or bricks will do. In Mexico in 1954 I saw a guitar maker using stones. When the fan braces are dry finish their shape taper the ends and put a drop of glue on the feather edge as Torres did., as it is easier before the main braces are glued. To finish fan brace contours use plane, chisel and shaped sanding blocks. IMPORTANT-the fan braces are NOT fitted to the contour of the solera but pressed into the solera, locked by the glue and when dry creating a spring.
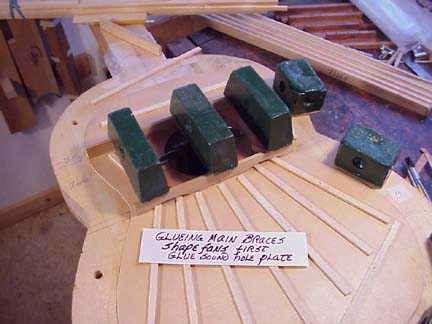
Glueing main braces, again I repeat shape fan braces first. Next glue sound hole plate takeing care to remove glue squeeze out from recess that will receive the tornavoz. Now glue the pre fitted to the contour of the solera main braces. When all is dry sand if you wish the inside of the top, Torres did not remove the glue squeeze out, as it is not necessary and will not affect the sound.
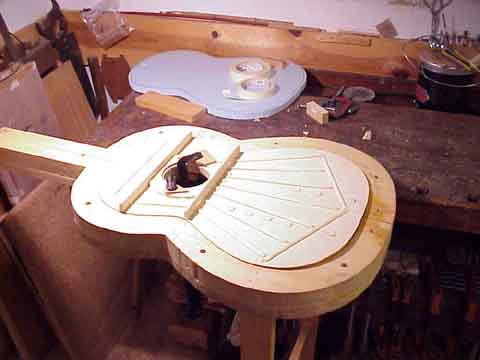
Note that the top in the image is made of three pieces. The cleats are to reinforce the joints.
- Classical Guitar Construction in the style Antonio Torres replicating La Suprema 1864 (2) Body Assembly Install Neck,Banding and Purfeling,Fingerboard
http://myplace.frontier.com/~nostberg/


Thank you very much.
This is perhaps the most clear and comprehensive guide on how to build a guitar with hand tools. Some tricks are simply brillant.